Power Apps Forms Tips and Tricks – Part 3
Hello everyone, welcome to the third in this series of articles where I provide you with many of the Tips and Tricks I commonly use when utilising Power Apps Forms.
You can view Part 1 of my Power Apps Forms Tips and Tricks here
You can view Part 2 of my Power Apps Forms Tips and Tricks here
Tip #8 – Security Logic
When creating a form, you may want certain security or visibility features in place over and above the security of the data source you are using.
If you are using Microsoft Dataverse, your security role(s) will determine which data you can and cannot read/edit/delete/append/etc, and the same applies for Microsoft SharePoint. In each case we can use the existing security as our ‘base’ and then create an additional layer of functionality with a separate list of permissions.
This might be a group of App administrators, it might be a group of users who should only see items awaiting approval, it might be your developers.. the functionality of this additional security is only defined by the scope you can imagine using it within.
I’ll give a short example here – I have an App, but I want only certain users to be able to view my administrator buttons, screens and overlays. There are several ways we can do this.
One of the first ways is to create a separate static list of people for each role, so you’d have a list of Admins, a list of Developers, a list of Approvers – whatever your required roles/functions are.
I have set up a a separate list here called ‘AppAdmins‘, in it I have a column for the Person Object and a column for a text copy of their email address.

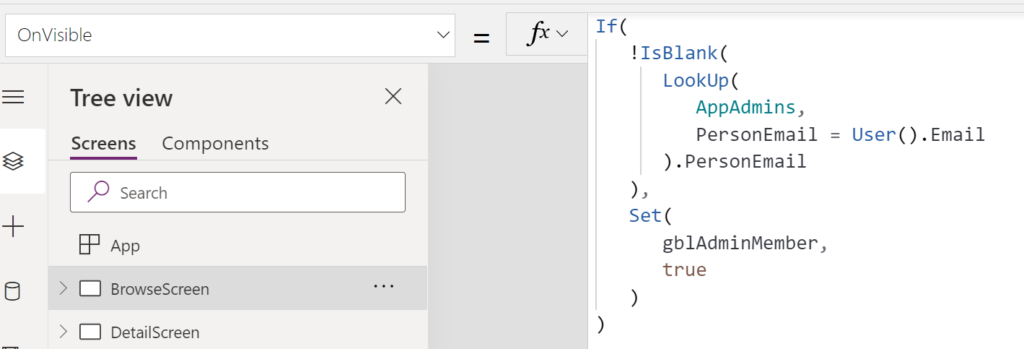
Inside the App, I have a check on the first screen of the App for whether the currently-logged-in person is in the AppAdmins List,
If(
   !IsBlank(
      LookUp(
         AppAdmins,
         PersonEmail = User().Email
      ).PersonEmail
   ),
   Set(
      gblAdminMember,
      true
   )
)
We can then use the gblAdminMember variable to show/hide certain buttons or labels or by setting the Visible property of these to gblAdminMember – we can also use this variable inside our logic calls as an override. We can have a set of validation rules for example, but if we are within the Admin Group, then the validation is not enforced, allowing us to submit edits that otherwise would not have been allowed by standard end-users.
We can also get our security logic by using Azure Active Directory security groups.

Once we have set up the group, we can use the Office365Groups connector to list its members, and then check if the currently-logged-in user is a member of that group. To do this lookup from Power Apps we will need to have the GUID of that security group, as this is what the connector requires for a lookup. You may want to store these lists of GUIDs in another list in your datasource to make them more manageable, and more scalable by not hardcoding them into the App.

Set(
    gblAdminGroupMembers,
    Office365Groups.ListGroupMembers("40e38c4c-1be0-4cd3-9e27-9b7701bf6d1e").value
);
If(
    User().Email in gblAdminGroupMembers.mail,
    Set(
        gblAdminMember,
        true
    )
)
Another way we can do this is within SharePoint if we wish to ONLY rely on the base underlying SharePoint list/site permissions we mentioned above. We define a new security list, then create a row for each of the existing Site/List security permissions, then we set item level permissions for each of the rows to only allow that particular security role to have read access to it.


Now that Owners row can only be seen by the Owners group. Then, inside our App, we do a check for whether we can see that lookup row’s value when filtering that list by the different permissions – if we can check the content of a row, then we must have the ability to read that item and hence must have the security permissions for it.

If(
    !IsBlank(
        LookUp(
            SecurityList,
            Title = "Owner"
        ).Title
    ),
    Set(
        gblSiteOwner,
        true
    )
)
We can then repeat those same actions for the remaining roles and are now able to hide/show things or create complex logic using the security role/permissions that user has.
There are of course many other ways to do this, although they will likely follow a similar process but with other datasources.
Tip #9 – Case-sensitivity when checking email addresses
When you are storing new users in your security role lists as described above, store them as lowercase by using the Lower() function around your value. This will prevent any issues with matching an email address of the currently-logged-in user (as is it possible in Azure Active Directory to have a primary SMTP address that is upper and lowercase even though emails are prescribed as case-insensitive items) – This however means that when compared as a text string the case sensitivity difference can mean the difference between being recognised by the App and not having access as
test@test.com = Test@test.com…is evaluated as false!
Tip #10 – Consistency when checking email address (UPN vs Primary SMTP)
When checking for user email addresses as we have done above, it is worth noting a few things.
Firstly, User().Email is actually the user’s UPN (User Principal Name – the name that you log into your account with) not their actual Primary SMTP address.
Secondly, some organisations may have their UPNs differ from their Primary SMTP addresses. There are a multitude of reasons why this might be the case, but for example, let’s say your finance system ties into your account names when using single-sign-on, but the finance system is limited to names that are 12 characters or less, so your UPN might jdoe@company.org but your Primary SMTP Address (what everyone who emails you will see on your reply address) might be Jane.Garrow-Doe@subcompany.org.uk which is too long for the finance system, and uses one of the company’s other domains as its email address.
When storing items for comparison, such as email, make sure you store and compare the same values, ie if you store User().Email UPN then compare against that.
Alternatively, make sure you check for both Email and User Principal Name. Using the Office365Users connector we can pass in the UPN using User().Email and then using the GetUserProfile function we can return both the Email address and UPN.

Set(gblThisUserProfile, Office365Users.UserProfileV2(User().Email));
If(
   gblThisUserProfile.userPrincipalName = "sanchoharker@iammancat.dev"
   ||
   gblThisUserProfile.mail = "sanchoharker@iammancat.dev",
   Notify("Give your cat a Nose Boop")
);
Trick #4 – Datacard Widths
Have you ever been annoyed by the Form editor? Yeah me too, but sometimes its quicker if you have a template and use the form control rather than recreate everything from scratch using patch statements.
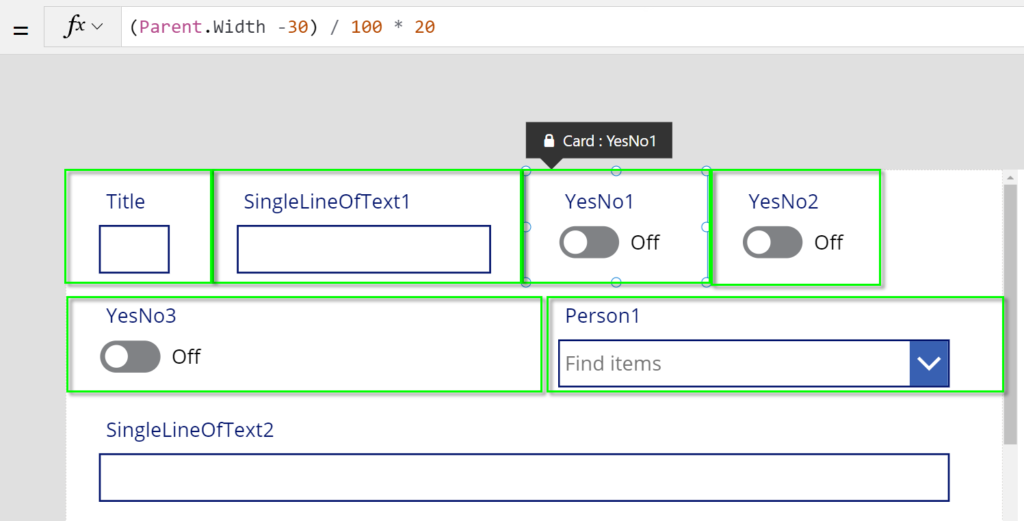
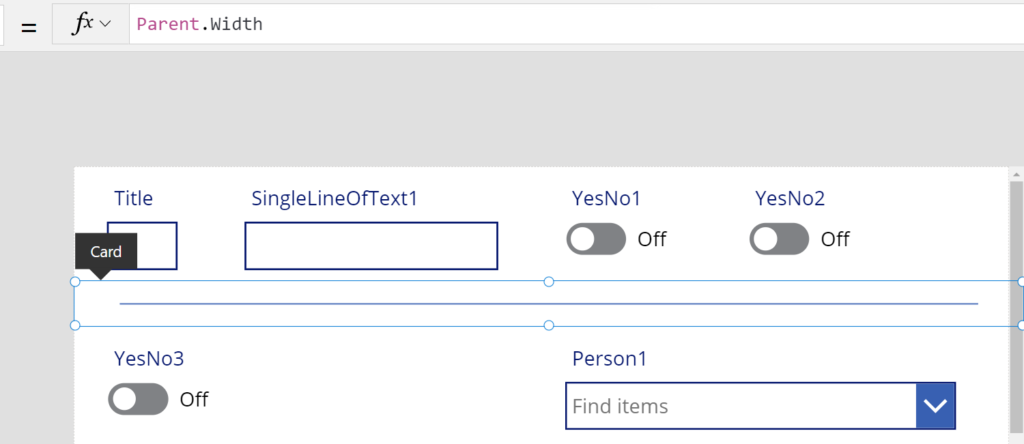
If you want your datacard widths to be exactly what you want without dragging them around and affecting the other cards, TYPE THEM.
My generic formula for this is:
(Parent.Width -30) / 100 * PercentWidthYouWantTheCardToTakeUpThe -30 is to give some buffer room on the right-hand side of the form for the scrollbar so that none of your items are ever underneath the scrollbar.
If you change the column numbers to 12 and turn off Snap To Columns, you’ll also be able to do this multiple times and get the layout you want.
In this example here I have two widths of 65% and one of 35%:

We can also make this much more complex, by expanding widths to make smaller fields take up larger space and vice versa:
Trick #5
Another great use of custom cards is to create a custom card that is the width of the form and then put a rectangle with a height of 1 in the middle of that card, then we can use it a spacer/divider between the cards. This can be done both horizontally and vertically to space between cards. Section Titles can be done in the same way by creating a custom card that is the width of the Parent and only putting a basic label in to describe the section while changing the background Fill to denote that it is a Section Title.
Trick #6
If you need a value to be filled but don’t want a user to be able to change that value, you can use a hidden datacard by having its visibility based on the security roles we mentioned in Tip #8.
Tip #11
You can make the ‘required’ property of datacards a logical value, that way we can customize when we want the field to be mandatory. For example, we may want the field to be required at stage 2 of an approval process but not stage 1, and we can bring the User security roles in here again by not only making it required in stage 2 but only if you are an administrator.

Trick #7
This is a HUGE one.
Let’s say you’re working on an App and you need to replace a control with another control from another screen or even another App. The normal process would be to paste the new control in, delete the old control, and then use the App checker to find any formulae that you need to update. This is slow and painstakingly-frustrating. The other option is to copy each of the properties of the new control and paste them in as the values for the old control. This, also, is super long and slow. Because if you try rename the old control to put a new one in, it renames it in all of the formulae where it is referenced.
Well, what if I told you that PowerApps will retain the references in two separate cases, when you copy the referenced items together AND if you re-use the same name on the new control AFTER deleting the old one.
In the below example, we have a set of controls, they are a gallery of selectable labels (as we had during the first two parts of this blog series) and a Text input whose default value is dependent on the gallery’s selected item.
If we copy the two together, then paste them elsewhere, the relationship they have with each other is preserved, even with the new _1 naming convention that gets applied. So then if we delete our original controls in the new datacard, we can replace them easily by pasting them into the datacard.
Now the magic part here is to rename the NEW control to the EXACT name the old control had. That way the datacard and all of the formulae will still look at it as if it is the original control!

Tip #12
When creating a form, DONT USE ALL CAPS ON YOUR LABELS – it has been shown that people scan quicker through normal (Pascal) case than through CAPITALS as they recognise the shapes of the words via their respective letter shapes quicker than reading through and interpreting each Capitalised letter.
Tip #13
Fill out your hint labels – in many cases you can just refer to the items text value like Self.Text or Self.Selected.DisplayName, but what you really should be doing is giving more context to the user – let them know something or ask them a question. For example if there’s a requirement from another question, state it in the hint text like ‘Have you completed XYZ before filling this answer?’
Tip #14
To reduce your control count in your Apps, get rid of your stars that are created in your forms. What you can do instead is change the Title of the card to include a conditional star at the end of the name:
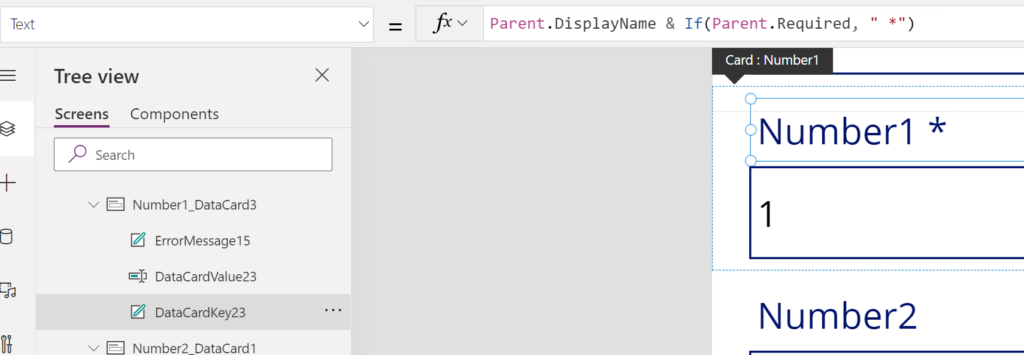
Parent.XYZ & If(Parent.Required, " *")Tip #15
This one is the same as the above, except we are going to do the same for the error messages. Now we will include a Char(10) to create a new line, and then we will change the text colour depending on if there is an error message:
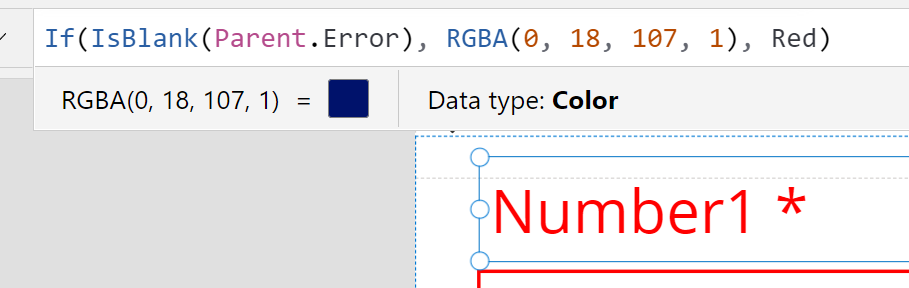
If(IsBlank(Parent.Error), RGBA(0, 18, 107, 1), Color.Red)
Parent.DisplayName & If(Parent.Required, " *") & Char(10) & Parent.ErrorIf you liked Part 3 be sure to follow me on Twitter for more tips and tricks.
You can find my other posts about Power Apps here.