
Enable features in older Power Apps
In this blog post I’ll show you how to check for and enable features in older Power Apps that have legacy flags and features set.
Introduction
When we open older Power Apps .msapp files or by using the the templates from the Power Apps maker site (many of which have not been updated in years), the features (feature flags) are set as they were when the App was last saved.
This is normally not a huge issue, and over time, the newer flags will get set automatically by the platform as they go through their cycle of Experimental > Preview > Production. However, if you are building an App that needs to be worked with immediately or cannot wait months for the next rollout then you don’t have a lot of choice.
For Example, some of the much older feature flags are actually no longer visible in the User Interface of Power Apps – this can present a problem when they interfere with a setting you need to enable. In some cases there are workarounds that will allow you to set one feature which then shows another, which then in turn allows you to toggle the feature you are looking for. However, this is not always the case.
The Issue
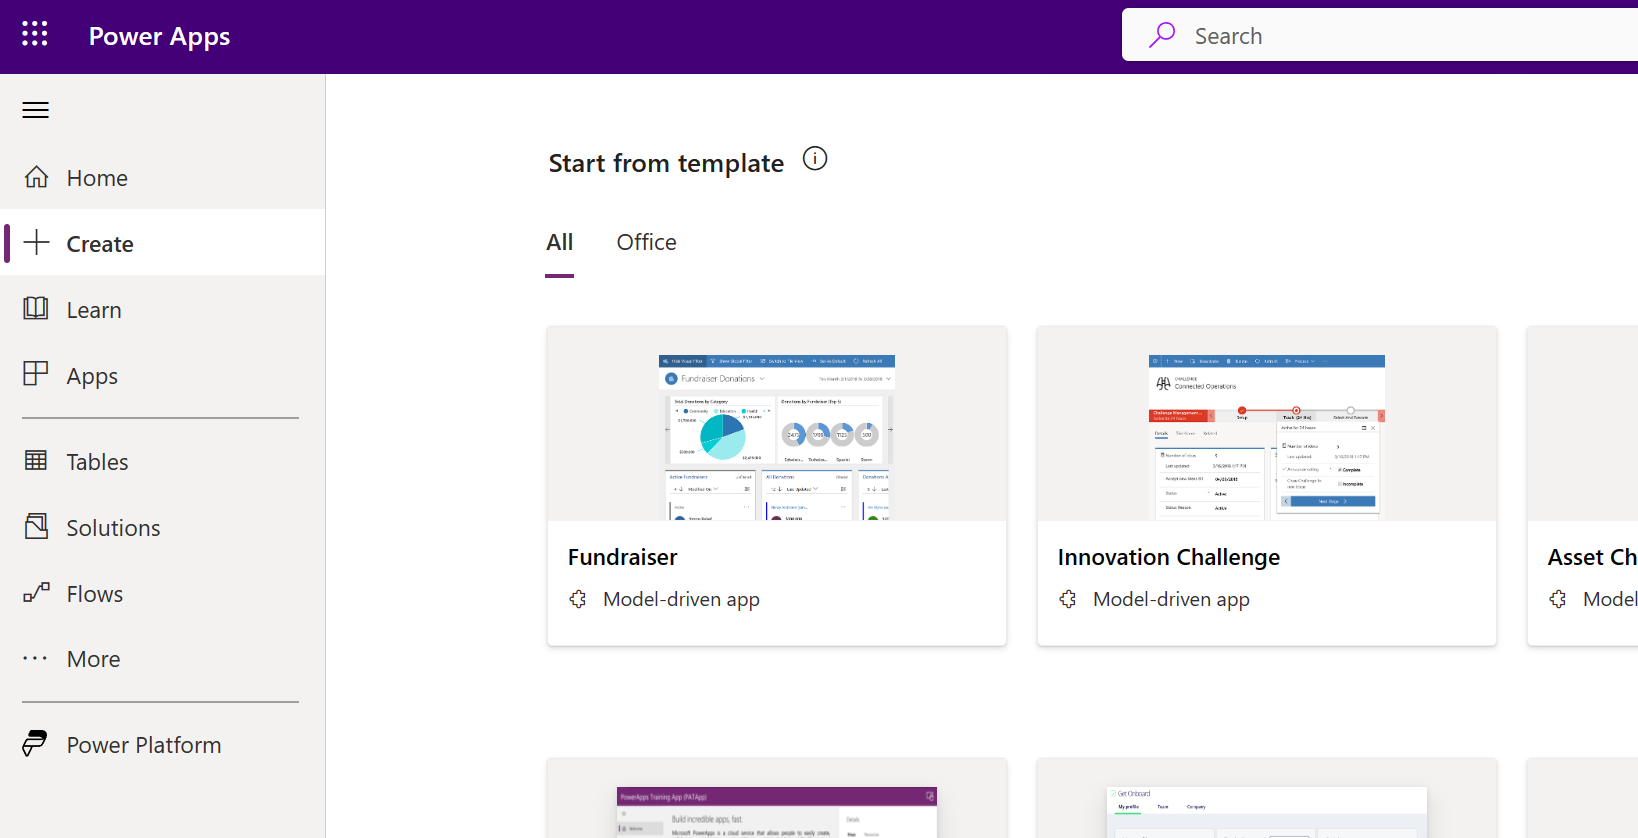
Let’s start by looking at an example – in this case I will be using the Out of Office template, which you can find at https://make.powerapps.com by clicking Create on the left-hand rail and then scrolling down to the templates section:
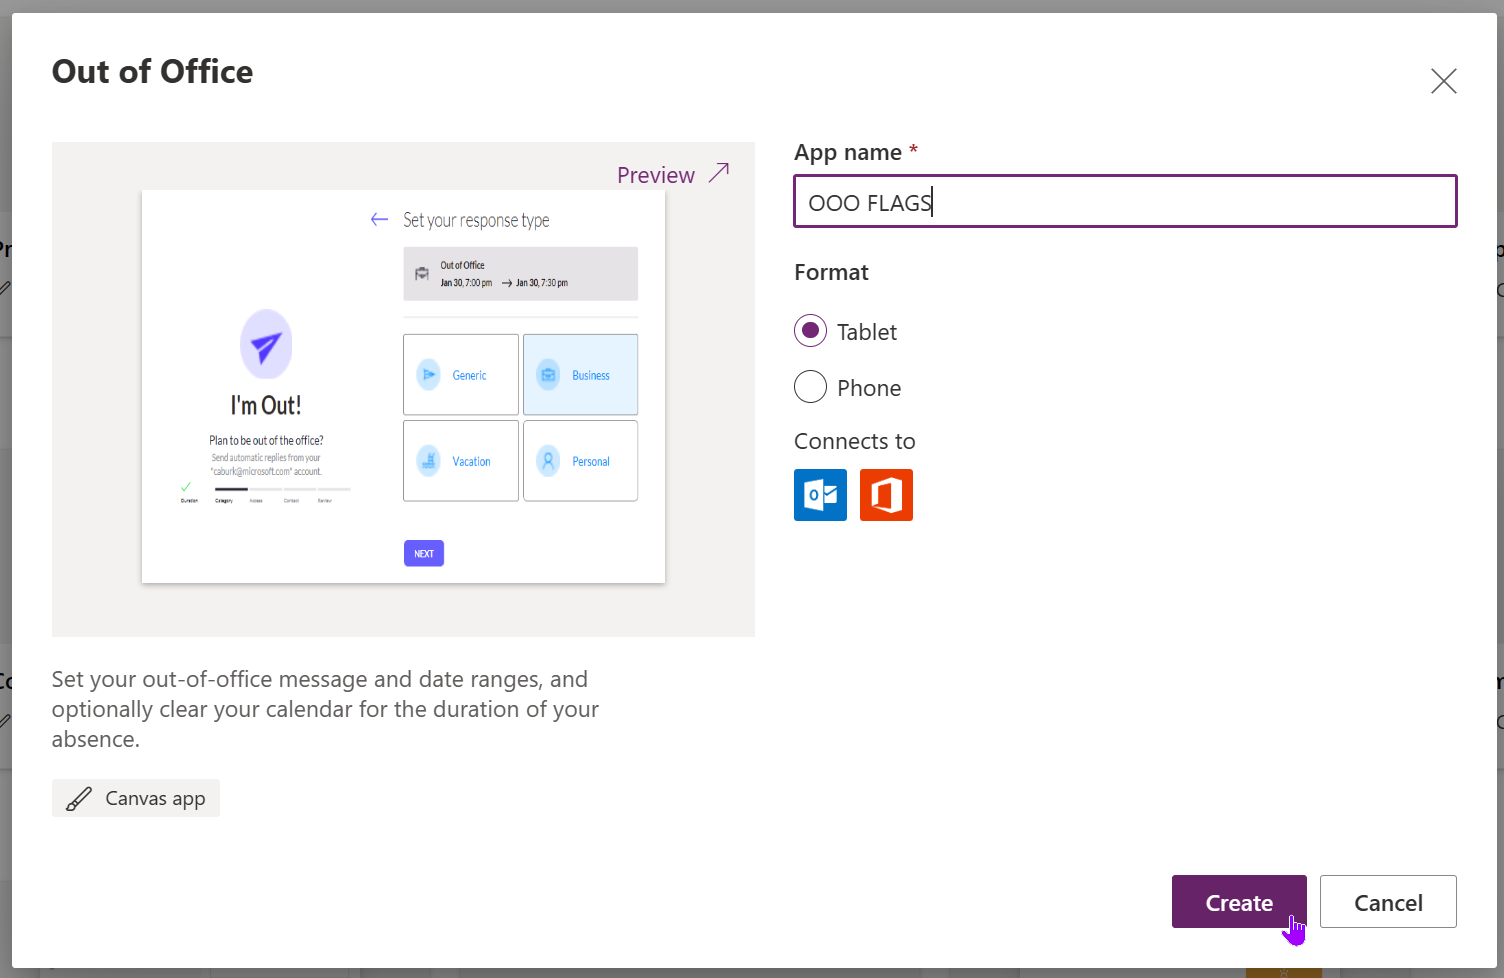
Then we choose or search for the Out of Office template app, give it a name, then click Create:
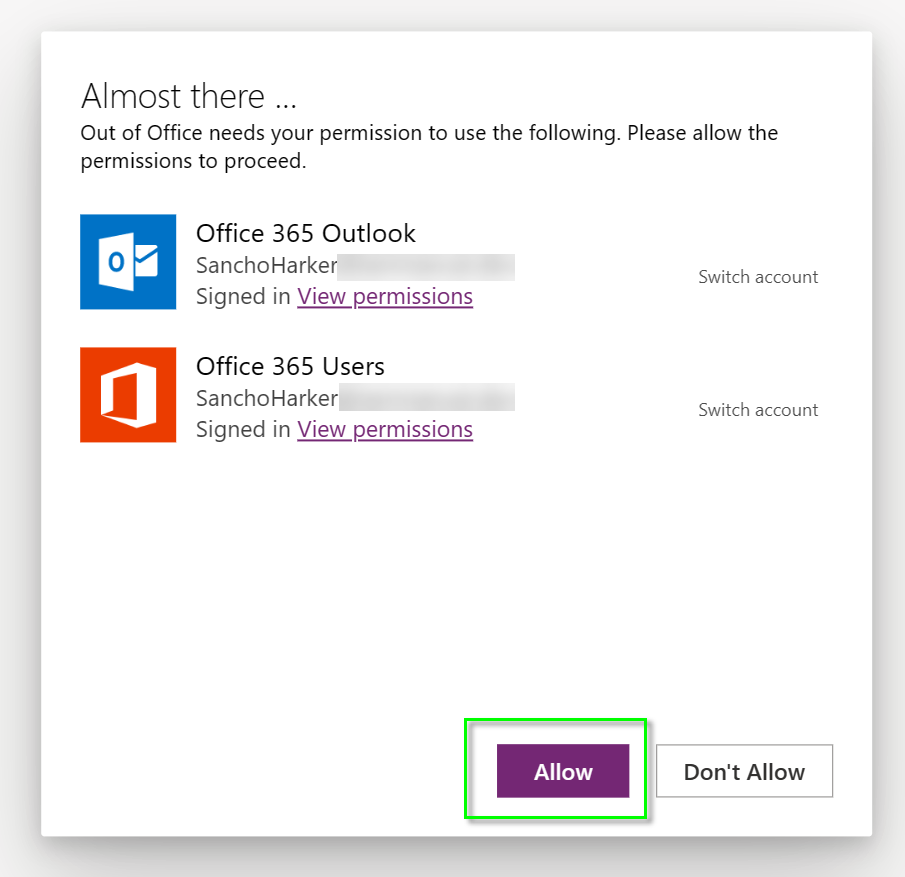
You will then be asked to confirm that you allow the connections used to make this App:
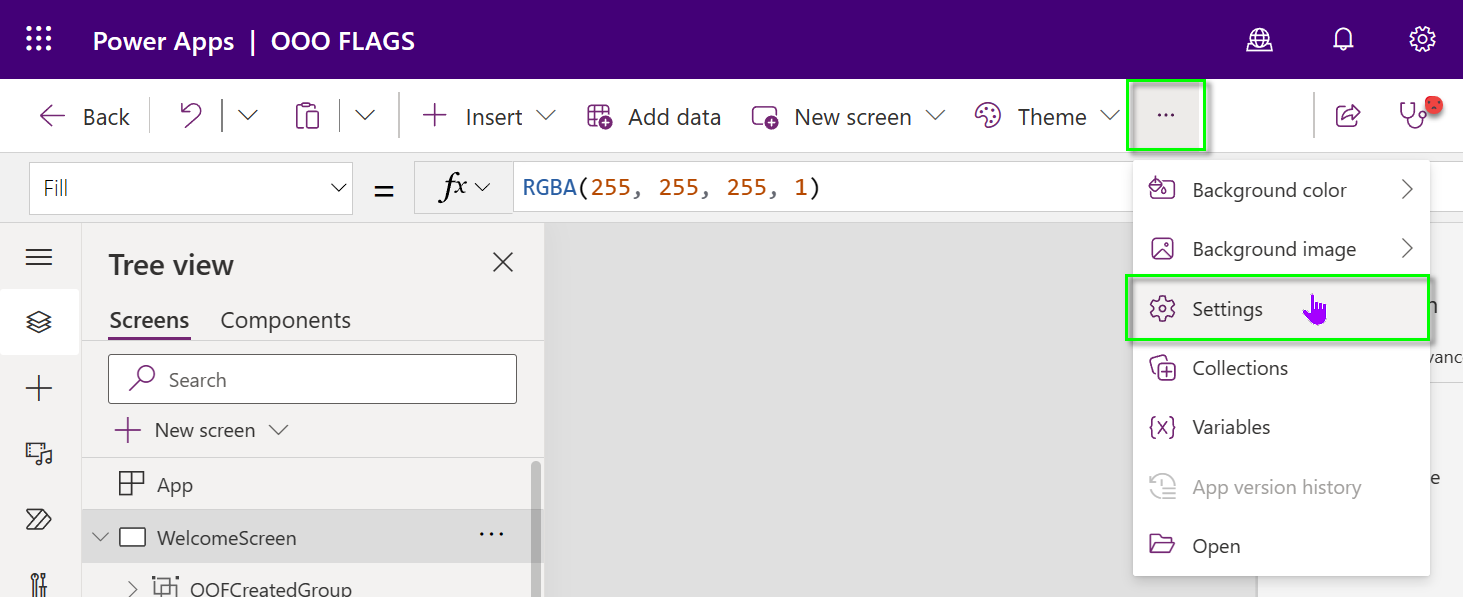
When the App has built, you may come across a screen similar to this one, which will be hilarious in a moment. The reason being, is that there is no File Menu anymore (replaced within the last few months), AND because there is no setting with the work concurrent in it (because this has been production-level for a LONG time now).
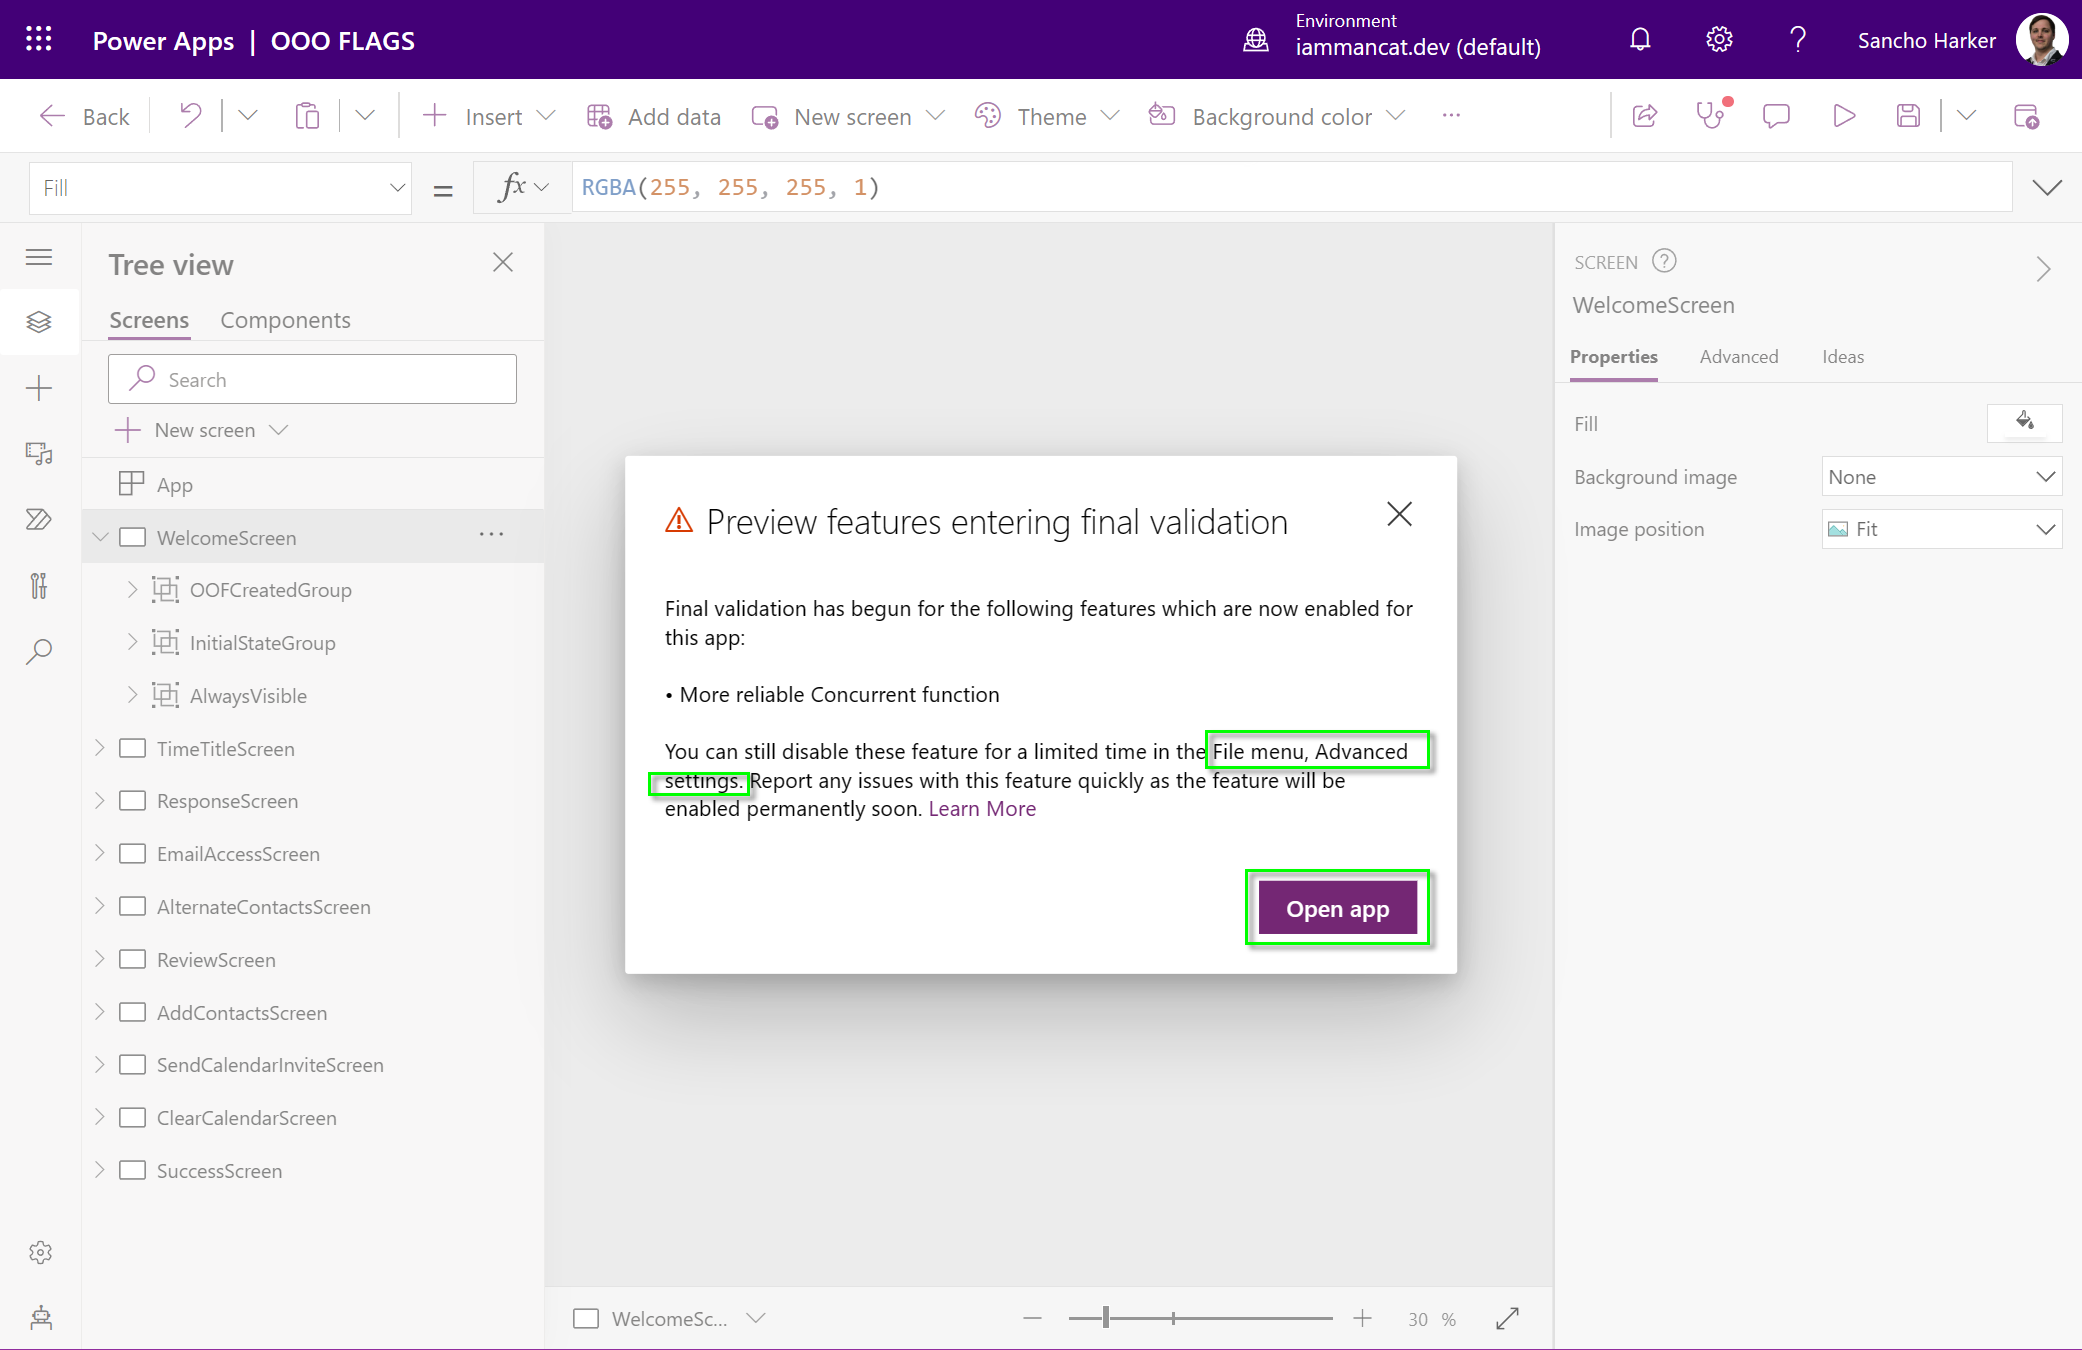
The reason we see this is because the App has feature flags set that are no longer in use by the User Interface, as these feature flags are set within the file itself. The more astute of you may also have noticed that there is an error in our App Checker, indicated by the red dot on the stethoscope icon. We will have a look at that in a different blog post..
As mentioned, there is no longer a File Menu – which in itself is additionally hilarious, AS THIS FEATURE IS SET BY A FLAG, which has been forced to On. Instead you can click Settings form the new command bar, or you can click the ellipsis which will then show you the additional option for Settings.

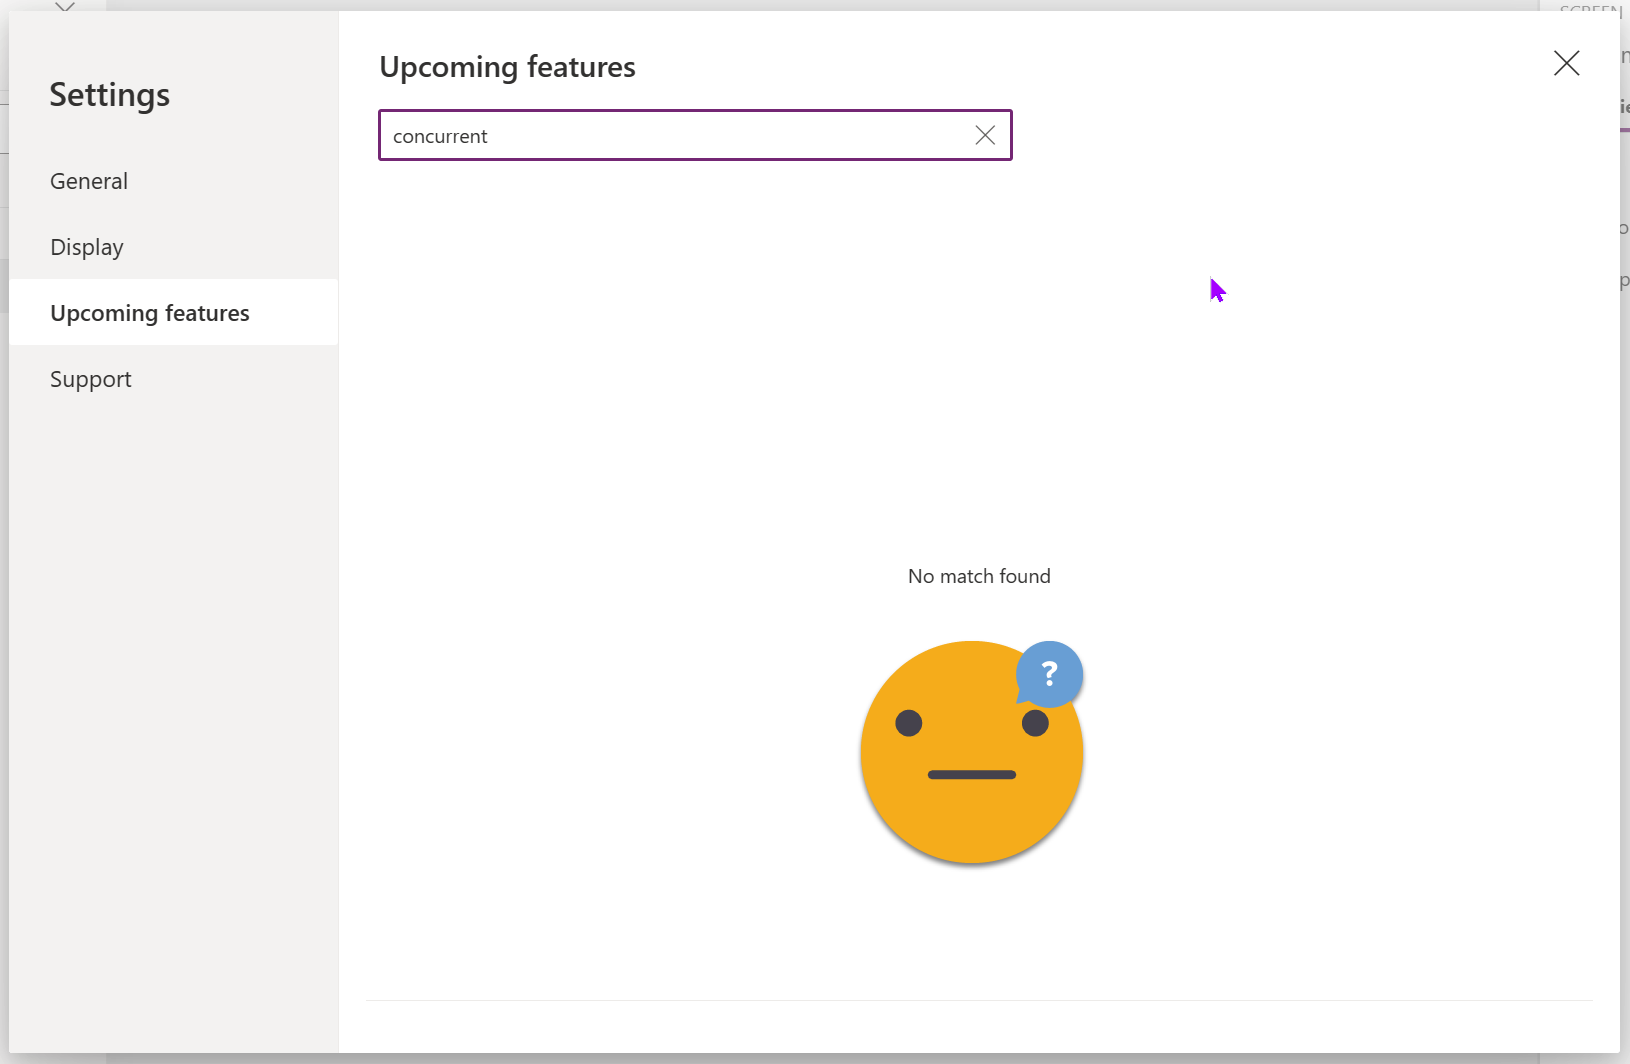
When we search for the ‘More reliable Concurrent’ setting, we will find nothing:
As a user, if you are not sufficiently knowledgeable about Power Apps, this will be an incredibly frustrating experience, as you are told to do one thing, but then unable to, and will likely go searching online for how to do this, wasting even more of your precious time.
But, this is not even the issue I wanted to highlight with this blog post. The issue is if you try to turn on some of the other features.
Let’s say we want to look at the list of data sources we’ve added to this app to remove any unused ones, or to rename them or just to get an overview of the data used in the App… wait, WHERE HAS THE DATA SOURCE BUTTON GONE?
In the old menu (again, a new maker won’t know this), we had a data sources button under View:
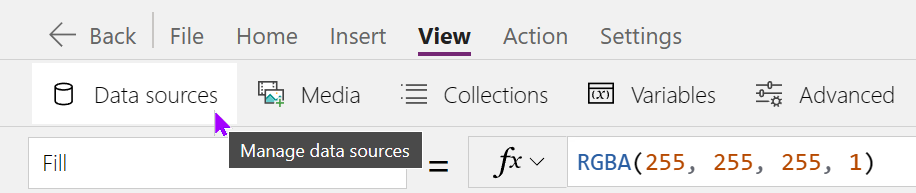
But, in our broken new menu, we have no way to view the data sources for the App.. This is INCREDIBLY frustrating as a new maker – I just want to know what’s in my App and I shouldn’t have to be doing work for that!
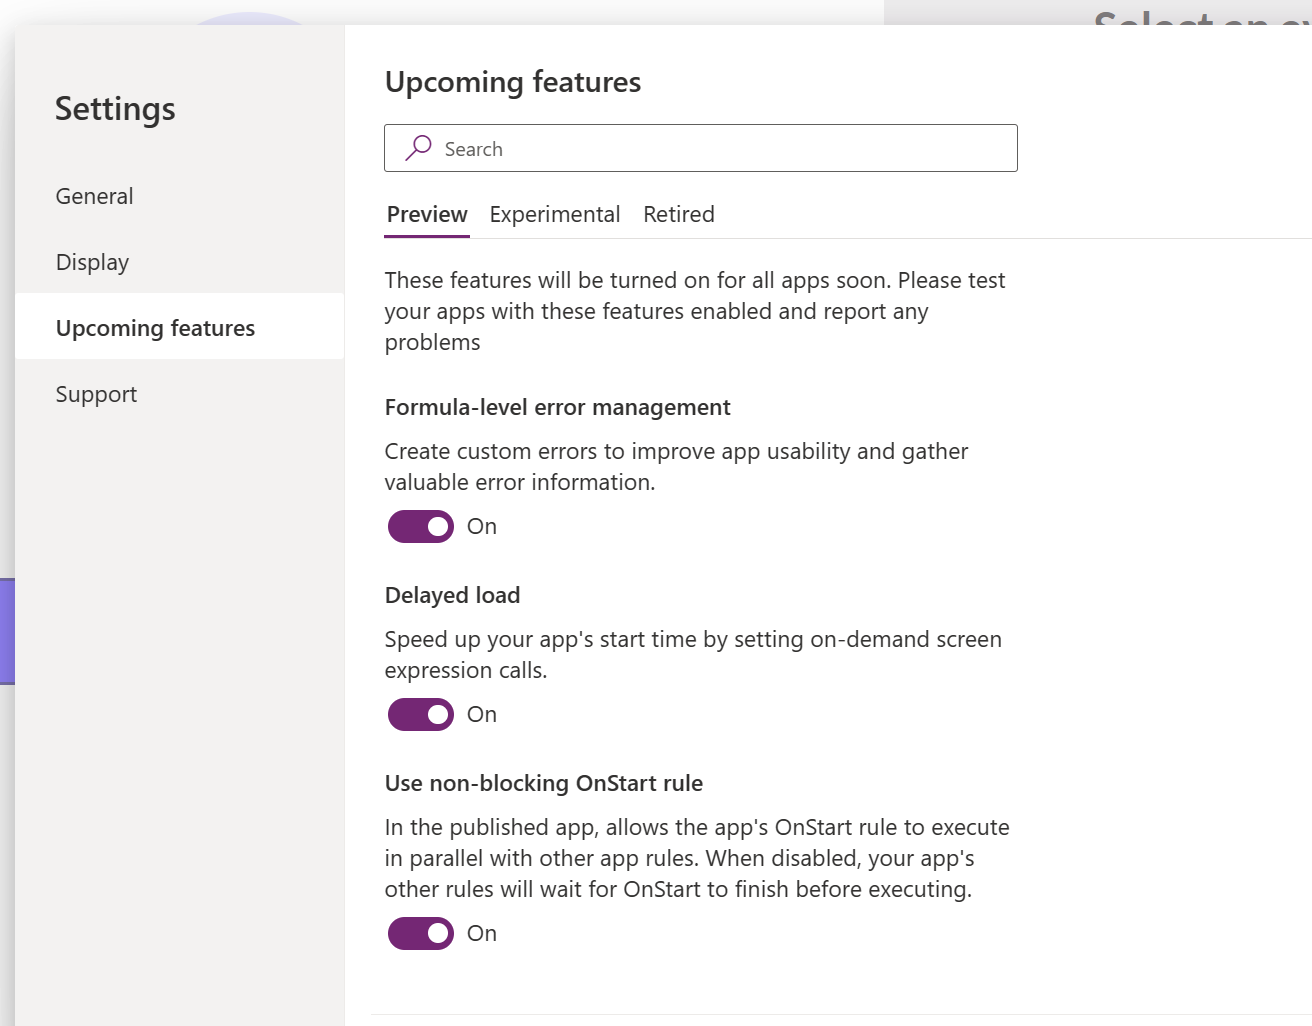
So, to get the newer data icon on the left-hand-rail we will need to enable the ‘Improved data source experience and Microsoft Dataverse views’ feature flag, which can be found by scrolling down within the General tab of Settings. Let’s try toggling that on.
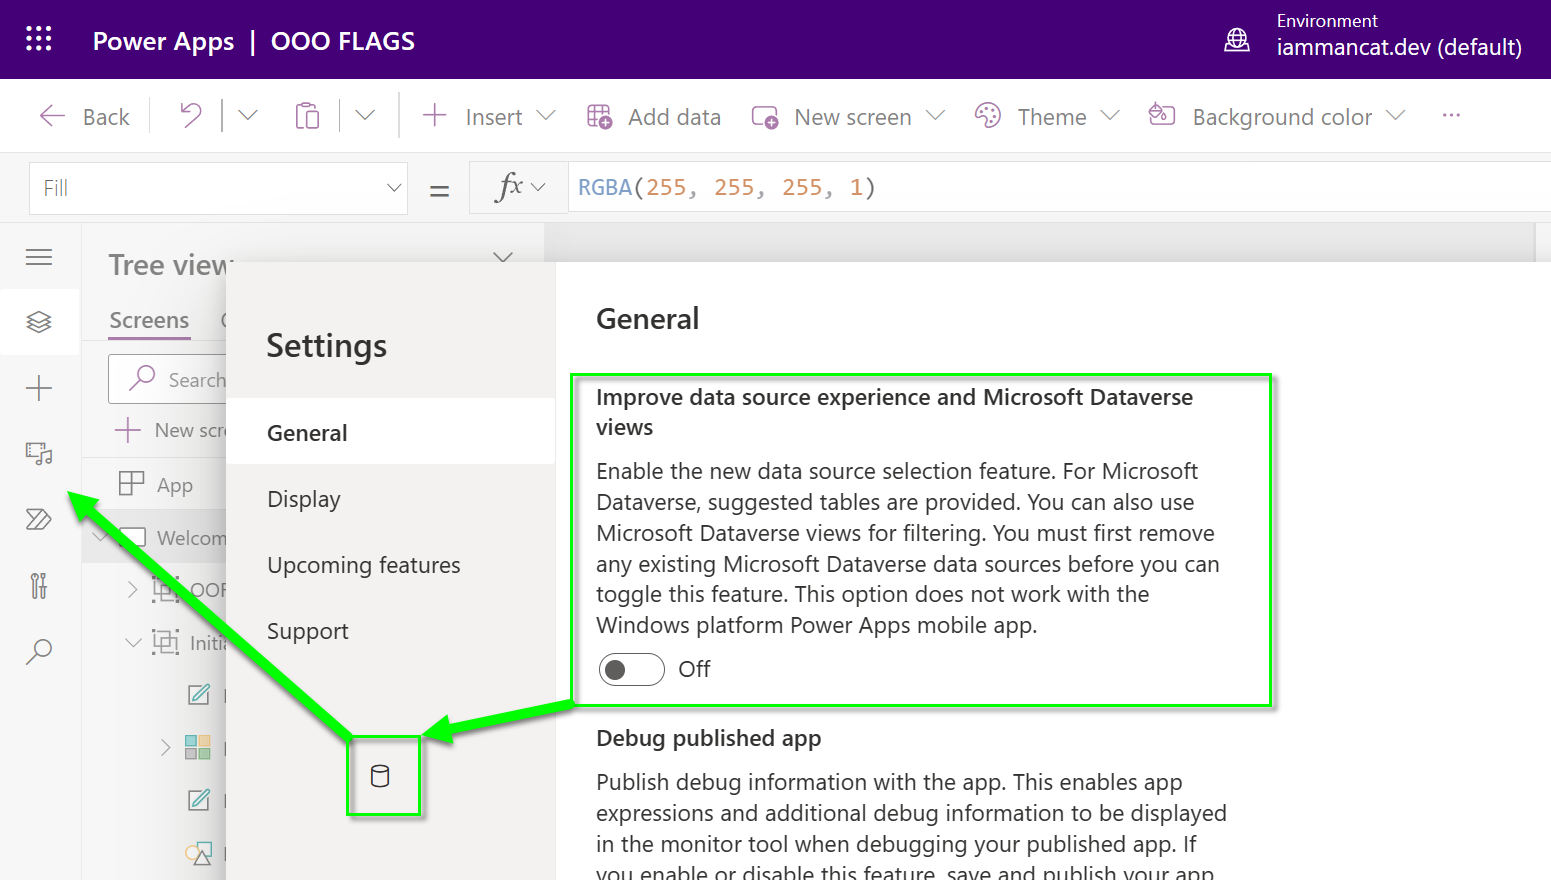
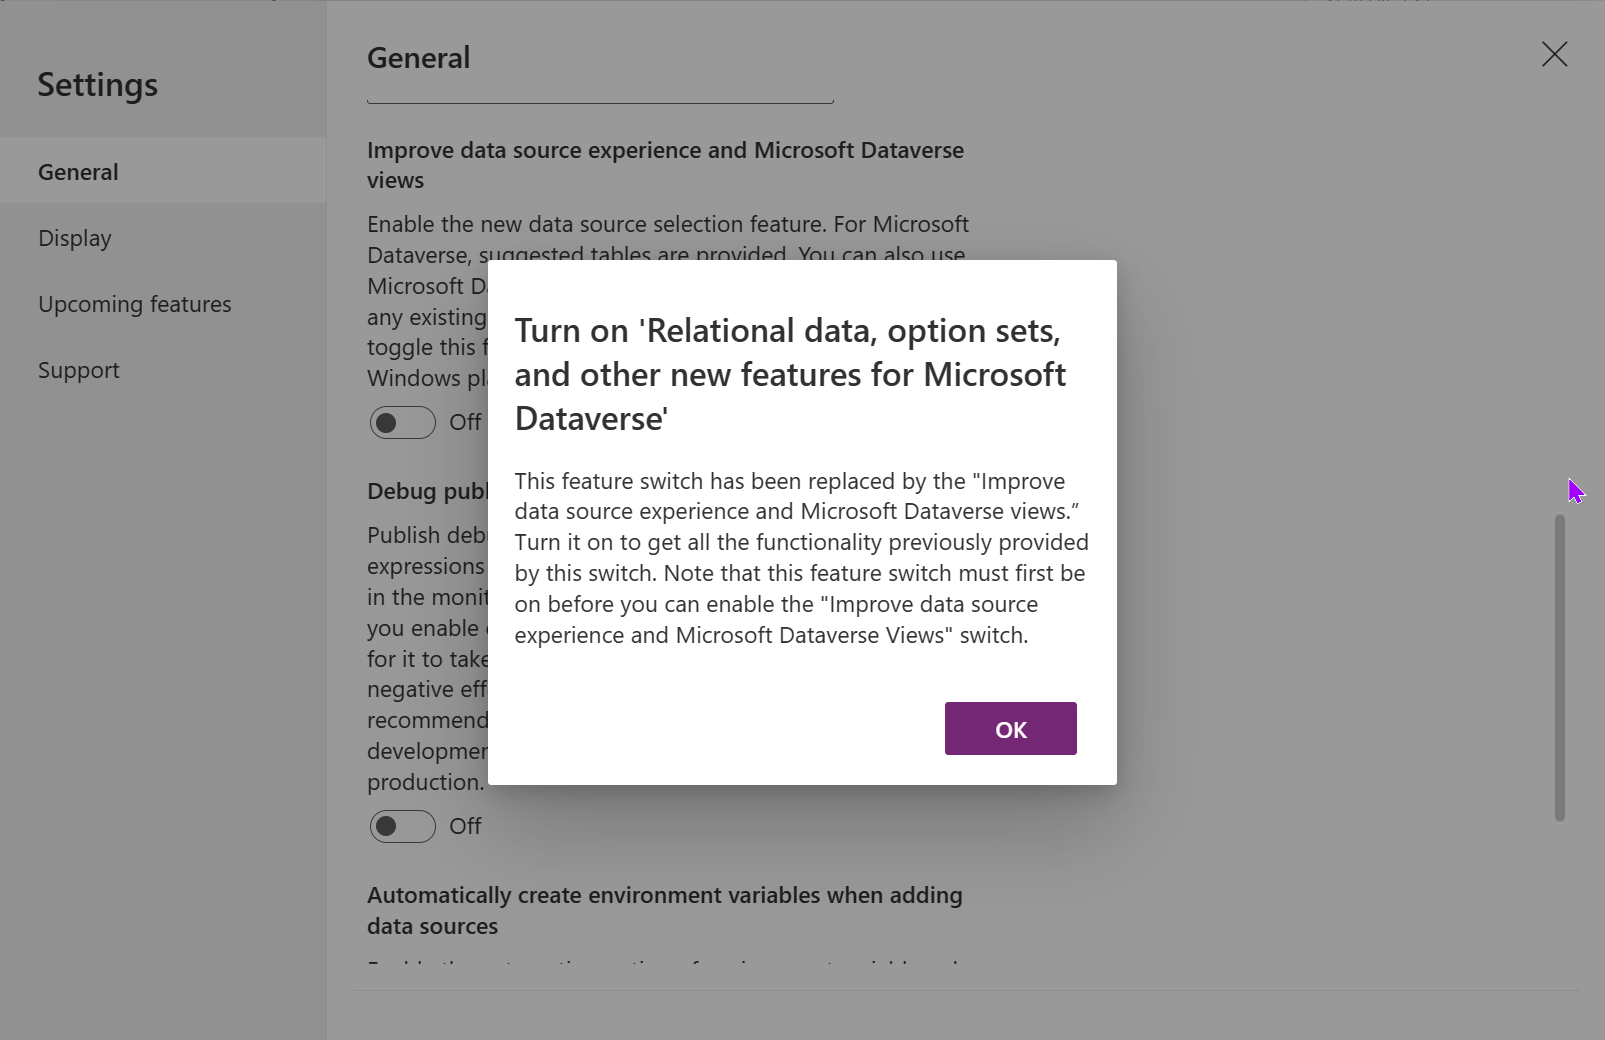
But when we do that, we receive a message that we need to turn on ‘Relational data, option sets, and other new features for Microsoft Dataverse’.
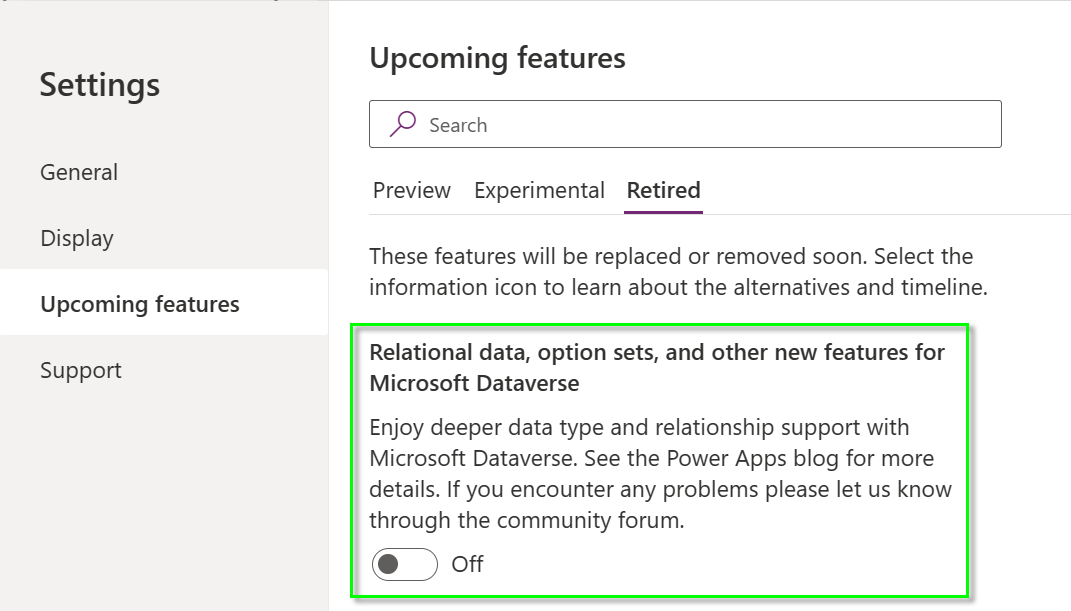
Here’s the problem with that though, when you look for it in settings, it may or may not be in the ‘retired’ section – if it is there, you can enable it, but this will immediately make it disappear! Yes I know this is part of a fix for this particular setting, but the method I will show AFTER this will apply to ANY setting in future.
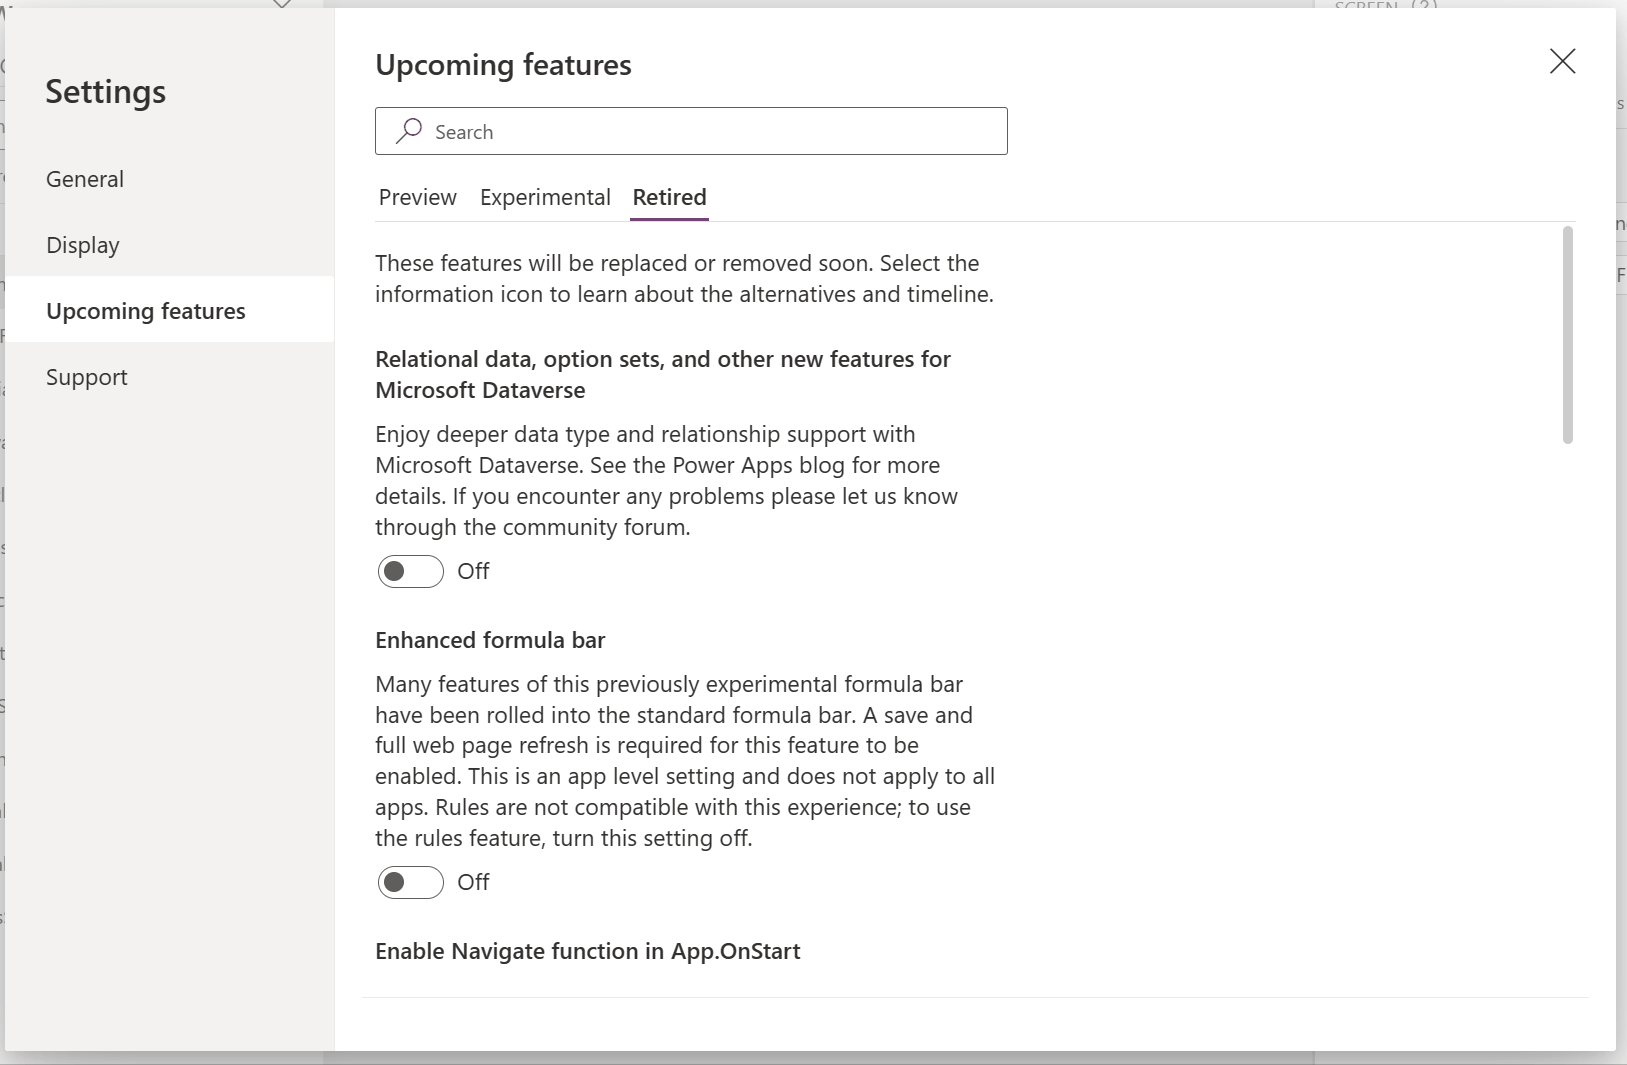
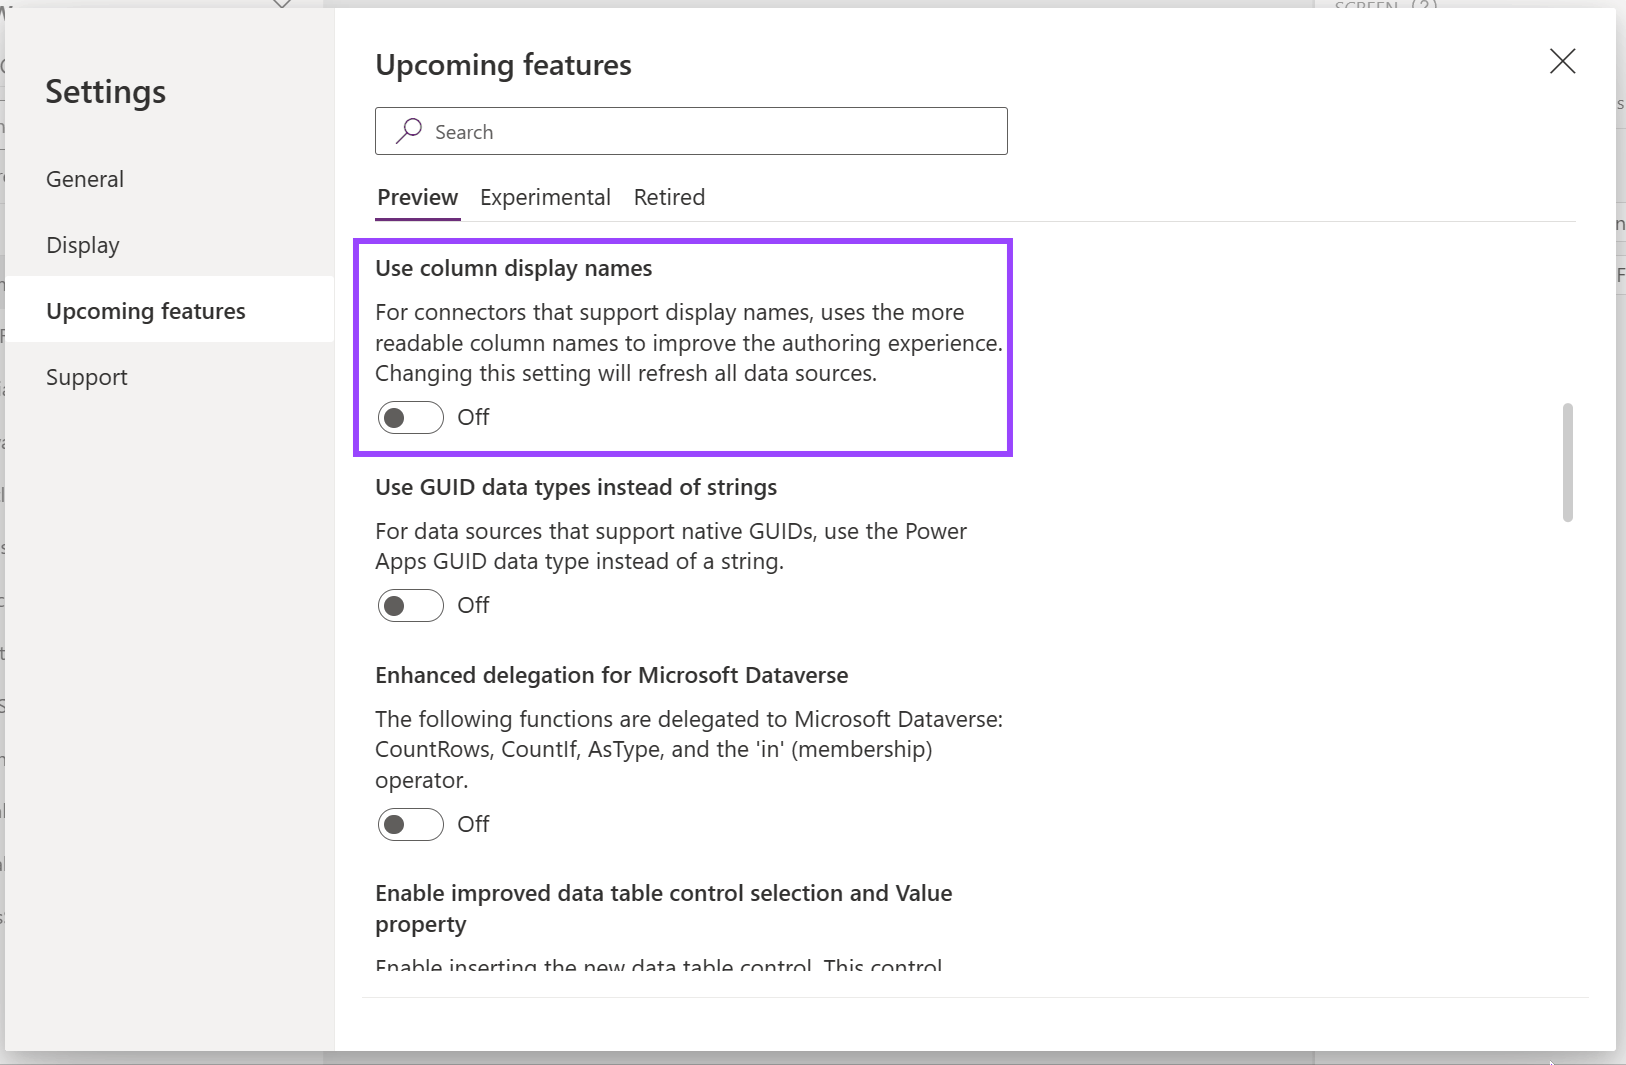
..So now what? Ok, let’s try turning on that original setting. Now we are told to turn on ‘Use Column Display Names’
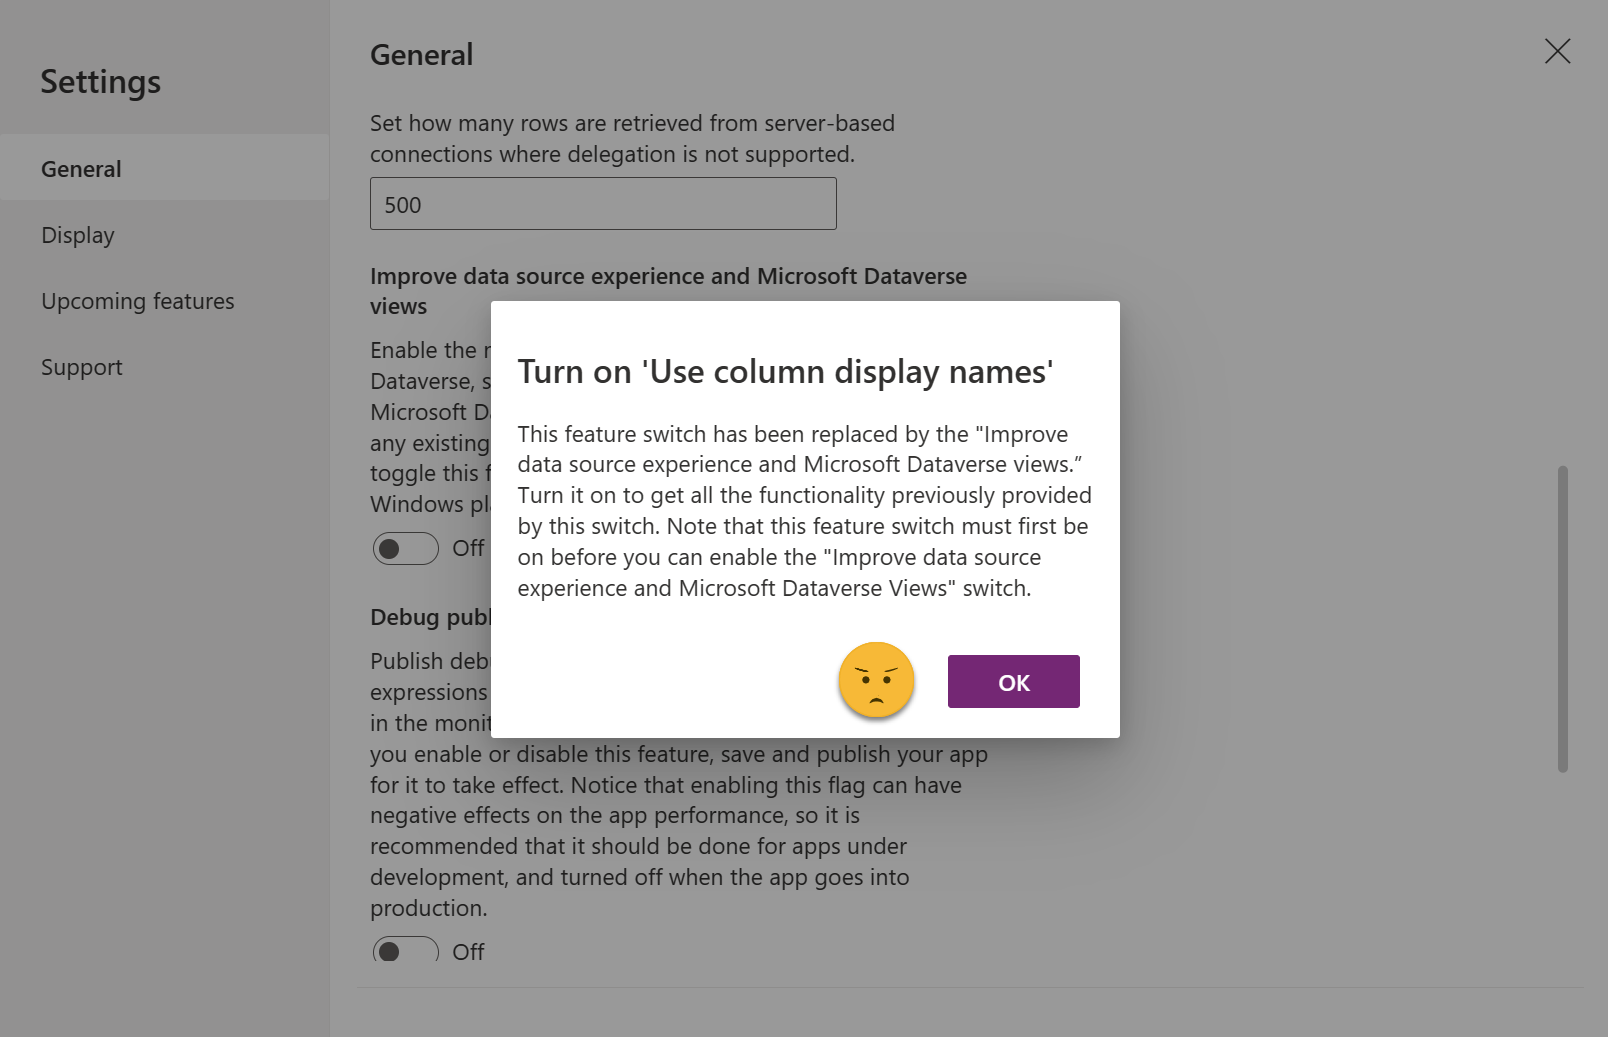
When we turn this on, it also disappears (these disappearances are because they are no longer selectable in newer Power Apps as they are an implicit part of the App experience now!)
Ok… so let’s try this again, we are going to FINALLY turn on the improved data source experience.
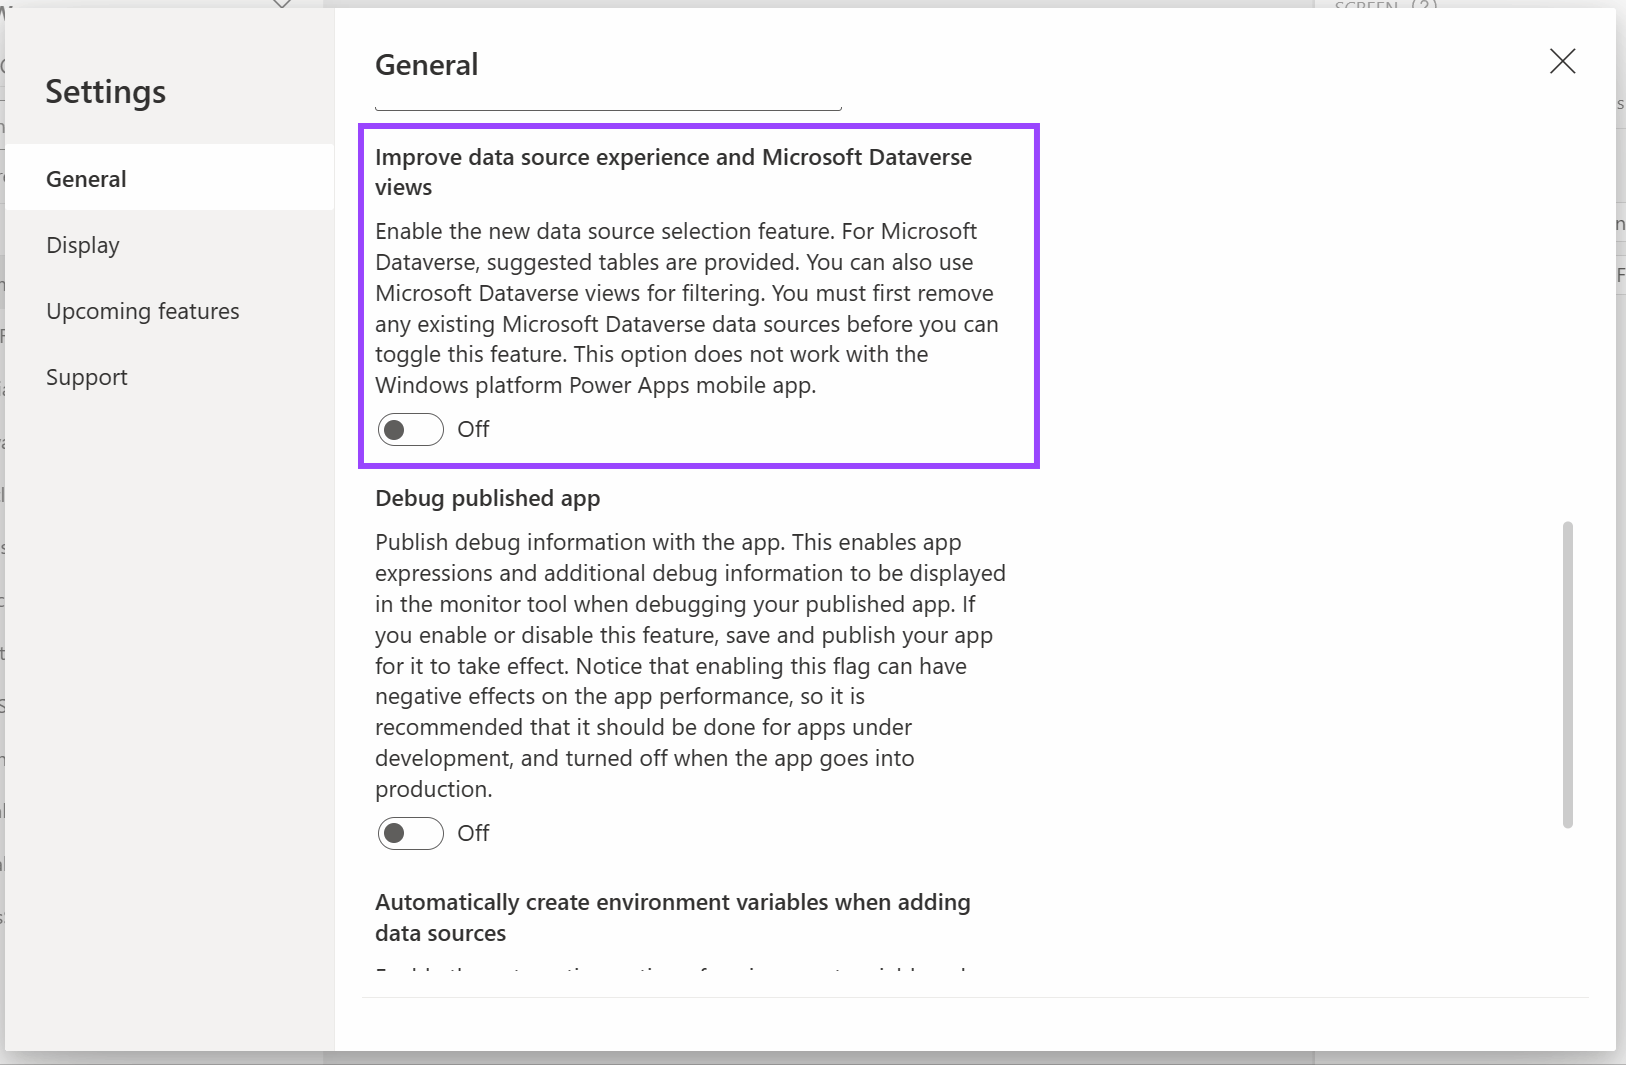

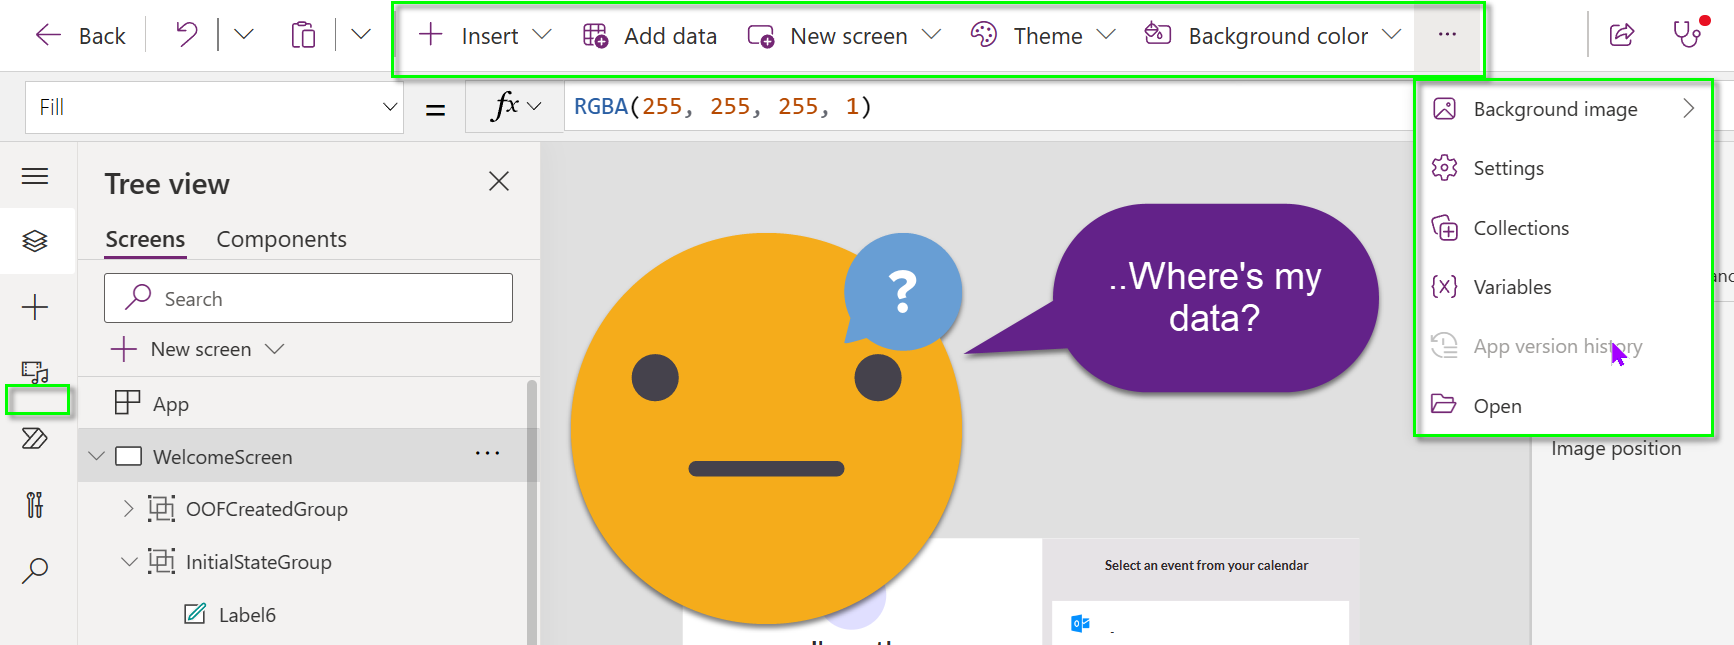
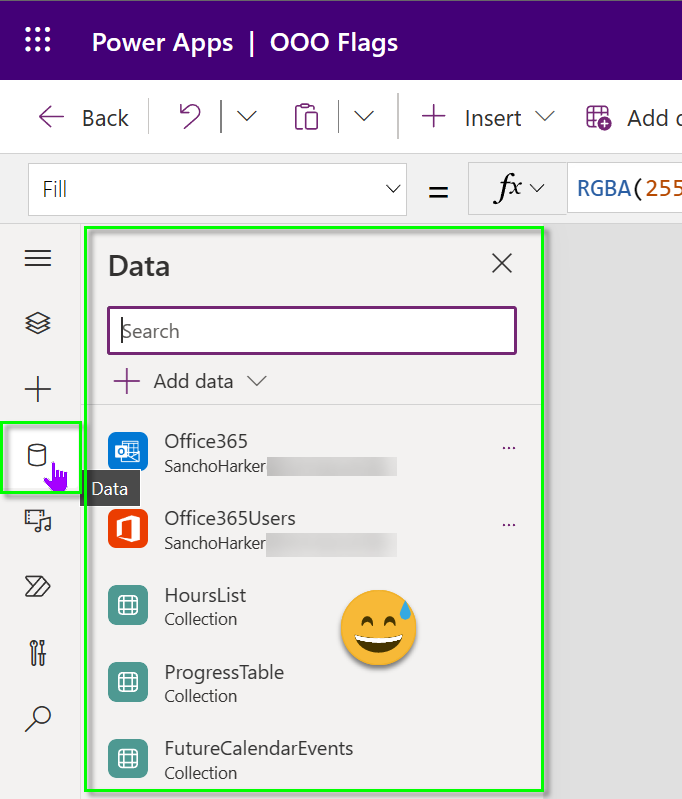
Now we finally have our Data icon on the left-hand rail!
Now the biggest problem here, is that ALLLLL of this was just to turn on one setting – what about all the others? What about ones in future when all of the current features are eventually in prod or retired/cancelled?
This seems like a lot of work and brain juice required just to get one setting turned on – surely there must be a way for us to enable ALL features in older Power Apps so that we get all of the modern settings enabled, just as if we had created a new blank App today?
The Solution
Ok, so there’s two possible ways we can do this – the first is to extract the msapp, edit one file, recompile it into a zip and then open it in the Power Apps IDE, the other is to use the Power Apps command line tool to extract the app then change the settings in that one file then recompile then open in the Power Apps IDE but they both really equate to the same thing – I think my version is easier because you don’t need to install the command-line tool just to use it.
Solution – enable features in older Power Apps in bulk
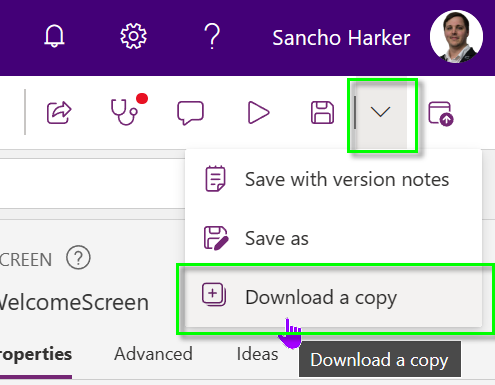
In this solution we start by getting a local copy of the file – we can do this by using the dropdown next to the save button in the command bar, then choosing Download a copy:
This will download a copy of the .msapp file to our downloads folder.
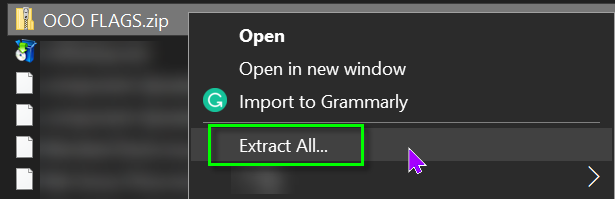
If you have 7zip or another smart zip tool, it will detect that the .msapp is a zip and give you a context menu to extract the files:

If you have a basic operating system zip tool (i.e. you’ve never installed anything for zips for your computer), then you can rename the file to a .zip file from a .msapp file, then use the operating system context menu for the zip and extract it to a folder:
Ok, now go to make.powerapps.com and create a blank new app. Follow the same last few steps to download and extract it.
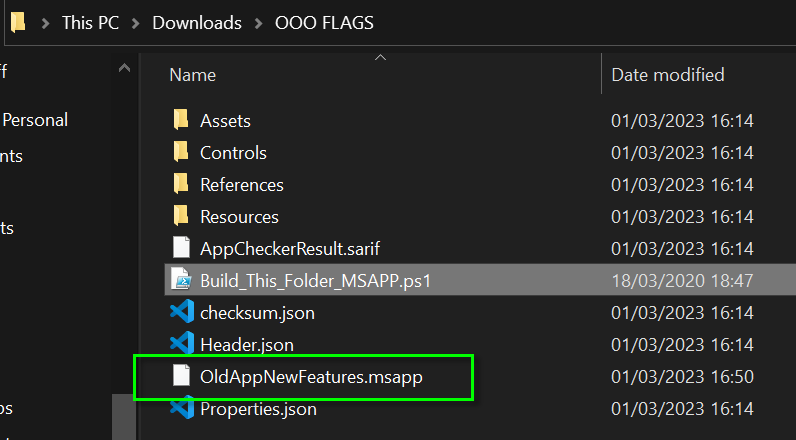
Now we have two folders, one for our ‘Old’ App, and one for our ‘New’ App – Inside these folders are a number of files and folders. Make sure to not add any other files or folders to these (except for the one I will mention soon).
In these folders you’ll see a structure like the following image:
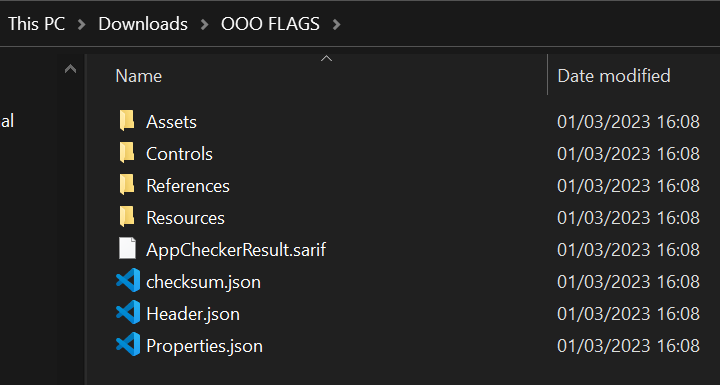
What we are looking for is the Properties.json file – this file contains the list of flags to enable features in older Power Apps.
It is at this point I would like to suggest that if you don’t already use Visual Studio Code as your text/code editor, I would highly recommend it – NB, not sponsored, I just love it – it’s fast, has many useful features, can have addons that deal with all sorts of different languages and allows you to format your code in many languages so that it’s not just a giant string of text.
So when you open this (I will use both Visual Studio Code and Notepad), it will be formatted as one long string of text which will make it difficult to work with.
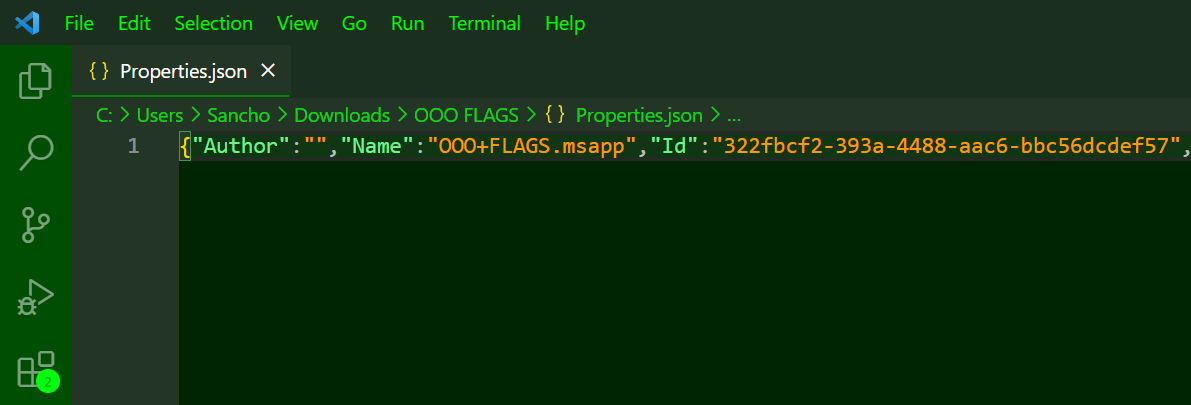
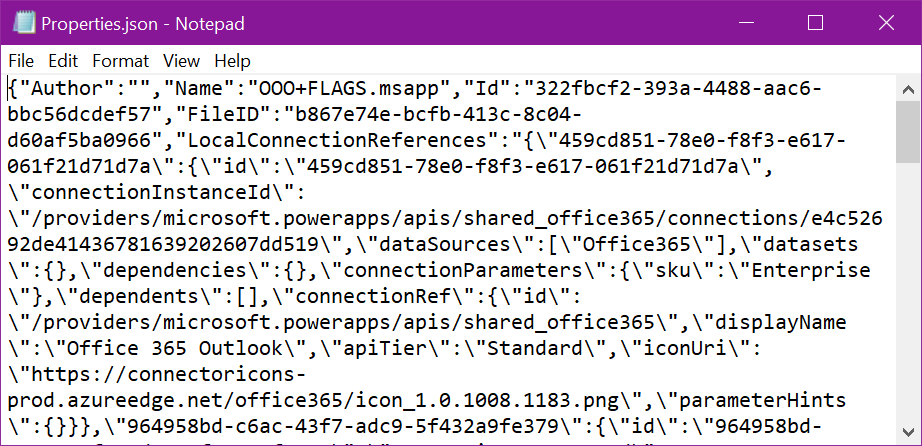
Inside the jungle of text is a particular property within this json-formatted file, called “AppPreviewFlagsMap” – what we are going to do is replace everything within its { } section with the contents of the new file’s AppPreviewFlagsMap section. This is the action that allows us to enable features in older Power Apps without having to do all of the extra steps.
In Visual Studio Code you can use the Format function (press F1 then search for Format, OR press Alt+Shift+F), which will lay the json data out for you in a nice structured format. In notepad, you will have to search the AppPreviewFlagsMap text and then replace anything from the first { following it to the next }
I’m going to take this moment to show you the difference between the Properties.json in an old App vs in a new App – in some older apps there will be flags that don’t even exist in new files and in this case we can see that a number of them that should be set to another property value to enable them (even though in the Power Apps editor they are hidden and cannot be toggled):
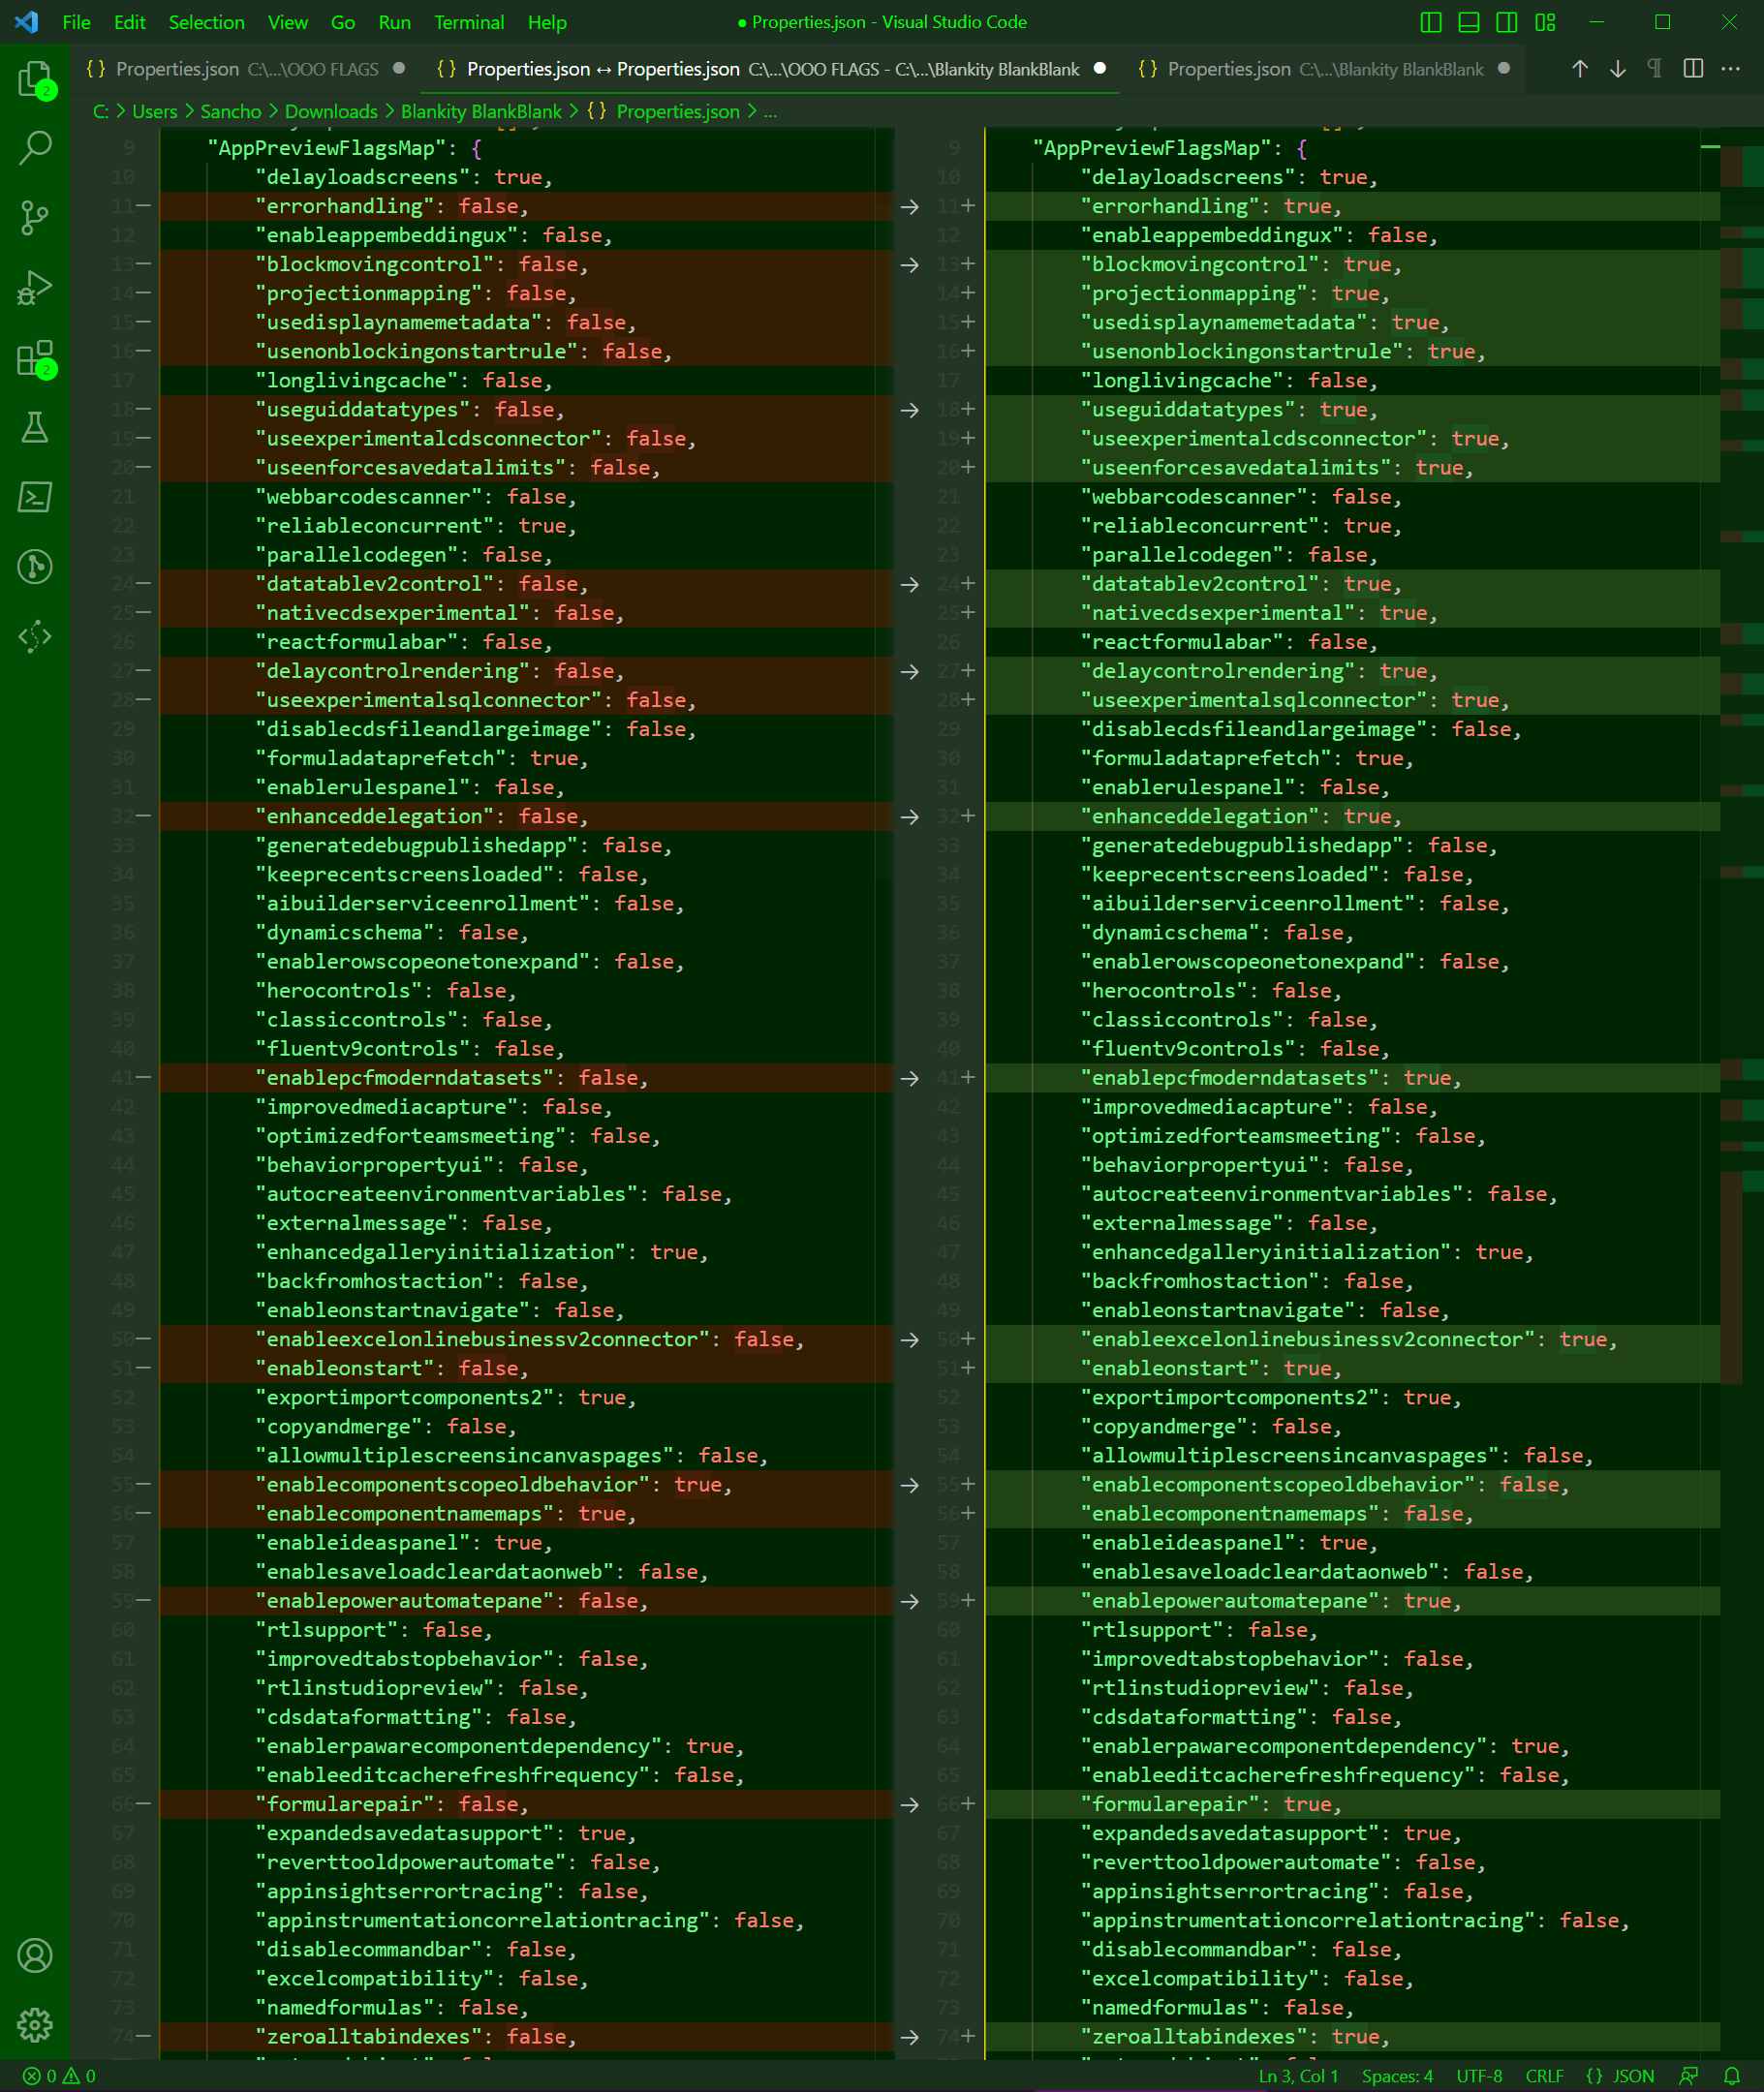
What you should do now is copy the whole inside of that AppPreviewFlagsMap section, and replace the old App’s section with everything from same section of the new App, then save the file.
Make sure that you don’t add any other text to the file – only copy everything within the { and the } for that particular property.
I will give an example of the AppPreviewFlagsMap code here below which is accurate as of 01 March 2023 (although ideally you should copy this from your own new file)
"AppPreviewFlagsMap": {
        "delayloadscreens": true,
        "errorhandling": true,
        "enableappembeddingux": false,
        "blockmovingcontrol": true,
        "projectionmapping": true,
        "usedisplaynamemetadata": true,
        "usenonblockingonstartrule": true,
        "longlivingcache": false,
        "useguiddatatypes": true,
        "useexperimentalcdsconnector": true,
        "useenforcesavedatalimits": true,
        "webbarcodescanner": false,
        "reliableconcurrent": true,
        "parallelcodegen": false,
        "datatablev2control": true,
        "nativecdsexperimental": true,
        "reactformulabar": false,
        "delaycontrolrendering": true,
        "useexperimentalsqlconnector": true,
        "disablecdsfileandlargeimage": false,
        "formuladataprefetch": true,
        "enablerulespanel": false,
        "enhanceddelegation": true,
        "generatedebugpublishedapp": false,
        "keeprecentscreensloaded": false,
        "aibuilderserviceenrollment": false,
        "dynamicschema": false,
        "enablerowscopeonetonexpand": false,
        "herocontrols": false,
        "classiccontrols": false,
        "fluentv9controls": false,
        "enablepcfmoderndatasets": true,
        "improvedmediacapture": false,
        "optimizedforteamsmeeting": false,
        "behaviorpropertyui": false,
        "autocreateenvironmentvariables": false,
        "externalmessage": false,
        "enhancedgalleryinitialization": true,
        "backfromhostaction": false,
        "enableonstartnavigate": false,
        "enableexcelonlinebusinessv2connector": true,
        "enableonstart": true,
        "exportimportcomponents2": true,
        "copyandmerge": false,
        "allowmultiplescreensincanvaspages": false,
        "enablecomponentscopeoldbehavior": false,
        "enablecomponentnamemaps": false,
        "enableideaspanel": true,
        "enablesaveloadcleardataonweb": false,
        "enablepowerautomatepane": true,
        "rtlsupport": false,
        "improvedtabstopbehavior": false,
        "rtlinstudiopreview": false,
        "cdsdataformatting": false,
        "enablerpawarecomponentdependency": true,
        "enableeditcacherefreshfrequency": false,
        "formularepair": true,
        "expandedsavedatasupport": true,
        "reverttooldpowerautomate": false,
        "appinsightserrortracing": false,
        "appinstrumentationcorrelationtracing": false,
        "disablecommandbar": false,
        "excelcompatibility": false,
        "namedformulas": false,
        "zeroalltabindexes": true,
        "untypedobject": false,
        "dataverseactionsenabled": false,
        "pdffunction": false,
        "enablebarcodereaderfeature": false,
        "packagemodernruntime": false,
        "enhancedcomponentfunctionproperty": false,
        "enableactionenhancedcomponentproperties": false,
        "enableruntimepolicies": false,
        "enablechatbotfeature": false,
        "tabledoesntwraprecords": true,
        "consistentreturnschemafortabularfunctions": false,
        "supportcolumnnamesasidentifiers": false
    },
ok, so now we need to bundle up this App we’ve modified. I have a PowerShell script here that you can run once you have placed it into the extracted folder of the Old App:
(if you want to know what it does, its just three lines of code that zip the folder contents in a way that Power Apps accepts)
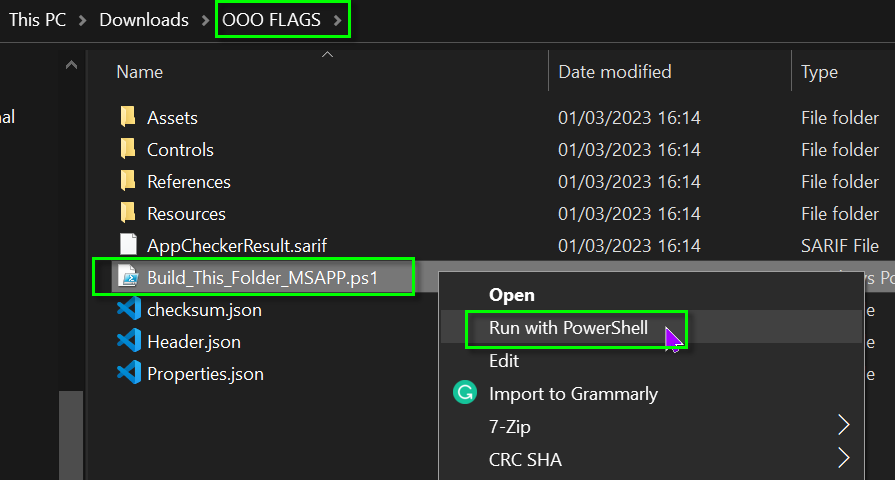
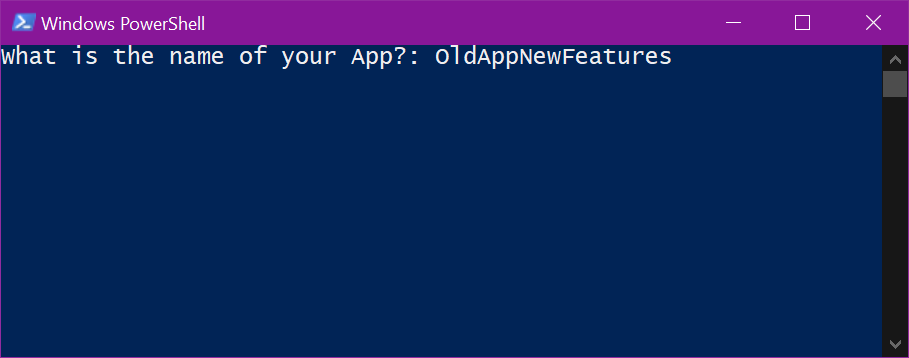
Press enter after giving your app file a name as prompted, and the PowerShell will zip up the contents of the folder it is currently in, producing a .msapp file:
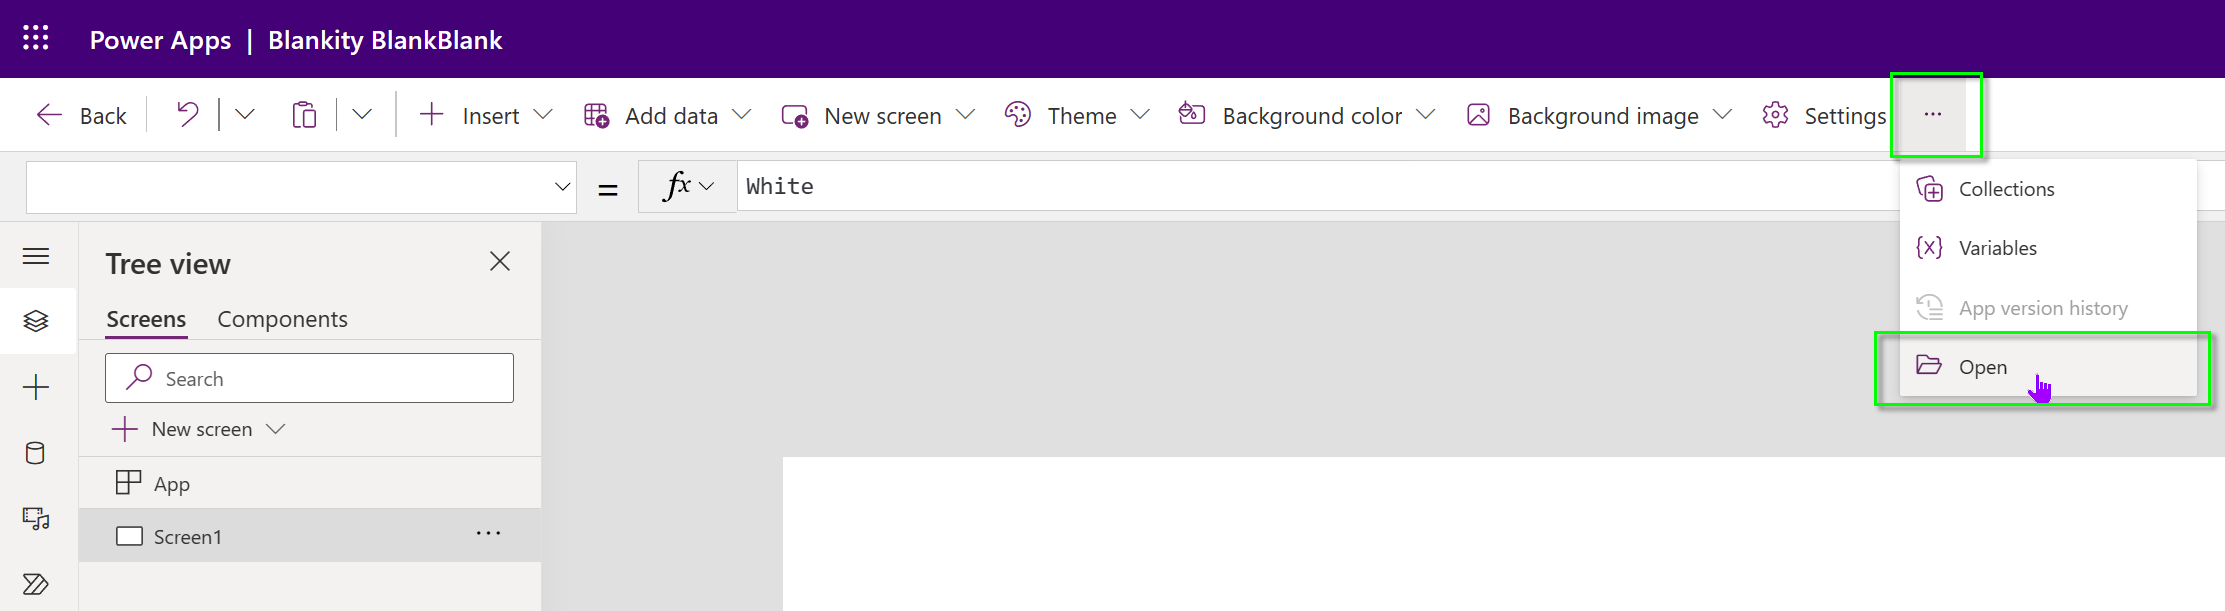
From the Power Apps editor, while you are editing another app (ie, create a blank app and edit it), you can then choose from the ellipsis to ‘Open’ a file – choose this new App file (OldAppNewFeatures.msapp in my case), now you can save this in your environment using Save As / Save.
If we check the feature settings, these now match the settings of any other new App developed. This set of steps lets you enable features in older Power Apps without going through and finding out which features you need to turn on to allow subsequent features – it will make it as if the App was developed today with a blank canvas, matching the feature flags of an App created today.
TLDR
- Download .msapp file of App,
- Extract contents to folder,
- Create new blank app, download, extract contents to a different folder,
- Copy AppPreviewFlagsMap content from properties.json of blank app that you extracted, paste in identical section in properties.json of old app.
- Repackage App using PowerShell Script
- Open from Power Apps Editor.
Conclusion
In this blog post we covered how to identify issues with feature flags, and then we were able to create a process to enable features in older Power Apps that becomes a single set of steps instead of the multi-step-multi-layer search that was involved in determining which feature flags were enabled/required/old/new.
I provided code samples that you could copy paste into your extracted older apps and code/tools for you to warp those files back up into .msapp files from extracted folders.
Thank you so much for taking the time to read through to this point, I really do hope you have gained some new knowledge or at the very least some inspiration for your Apps! (Always dig deeper!)
If you want to check out my other blog articles you can have a look around here: iAm_ManCat Blog
You can find links to my various social media accounts at the bottom-right of this page 🙂
Hope you have a great day!


Hi,
Just posting here to say thanks so much for this. It’s helped resolve a problem with a huge app that I have that I REALLY didn’t want to have to rebuild.
Nice one 🙂
Hi @iAm, I did all this yesterday and I am still getting the Improve data source pop-up when I go to settings. The thing is, I do not actually have this option showing in my General area. So honestly, I don’t know how to turn it on. I guess I am wondering if there are specific flags (I am thinking of the 3 things they want turned on from the top of your article) that I could adjust in the Parse Json to turn them on. I don’t seem to be seeing anything that matches. Any help would be appreciated.
Hi Heidi!
I’ve actually seen a similar post on the forums recently, and that particular user said that “automatically create environment variables when adding data sources” was the culprit in their case, as it was asking for this setting to be turned on even when it was already turned on – could you check if you have the environment variable toggle on and try turning that off?
Cheers,
Sancho
Hi IAm_ManCat,
I am not sure if you can help me. I did everything as laid out, but it didn’t solve one of my underlying issues. I hoped doing this would sort out an issue I was having with Collections. When I create a collection and go to (x) > Collection > Collection > View Table to see it, I am not getting any column headers. Not only are they missing, but I used to be able to adjust the column size and can’t do that anymore, so many of the columns that show are slivers and it is impossible to read what is in them. Any help would be appreciated.
Hi Heidi,
This seems like a bug in the Power Apps interface rather than an issue I can help with – I would try raising a support ticket with Microsoft if that’s still an issue,
Cheers,
Sancho
Hi iAm_ManCat,
Not sure if it’s only me but now I cannot see Save As functionality because not available … -> Variables -> Save As which I used very recently and aldo not available Enable Legacy Ribbon.
How can we replace the existing app by our just opened from local file?
Thanks,
Tom
Hi Tomasz!
If you use the ellipsis … and then choose ‘Open’ you can still access the old menu to use the Save As function correctly – the ‘new’ Save As (near the publish button) is still broken, so using the older menu is still the only valid way to do this from the studio 🙂
The legacy ribbon has been fully deprecated in Power Apps version 3.23031 onwards and can no longer be enabled (see here: https://learn.microsoft.com/en-us/power-platform/released-versions/powerapps-studio-players/3.23031)
Cheers,
Sancho
Thanks a lot @iAm_ManCat!