
Working with weekdays in Power Apps
The majority of Apps are built for business purposes and as such many companies (and makers by extension) will often need date calculations that only involve weekdays in Power Apps.
Often we will need to get the next or previous weekdays in Power Apps, as well as validate whether a chosen date is within a work week.
There are a few ways we could go about this, I will provide a few of those ways below.
Within the next 30 days, get all weekdays in Power Apps
One of the ways to do this is to create a collection of dates and then remove the weekends. This can be useful when determining future dates for work items or validating holidays, leave, SLA’s – anything that needs to work around the business day (weekday).
We can insert this code on any actionable property. In this example I have used a button, but it could easily be the OnVisible of a screen or any other behaviour property.
// Create NBD Date Range by adding next 30 days
// but only if they are not sat/sun
ClearCollect(colNBDRange,
   ForAll(
      // This does the next 30 days,
      // sequence can be as large as you need
      Sequence(30, 1, 1),
      If(

          !(Weekday(DateAdd(Today(), Value)) = 1
         || Weekday(DateAdd(Today(), Value)) = 7),
           {
              RowID: Value,
              Date: DateAdd(Today(), Value)
           }
      )
    )
);
Within the previous 30 days, get all weekdays
We can reverse this and look at the previous 30 days and extract the weekdays within them by subtracting instead of adding days
// Create PBD Date Range by subtracting the previous 30 days
// but only if they are not sat/sun
ClearCollect(colPBDRange,
   ForAll(
      // This does the next 30 days,
      // sequence can be as large as you need
      Sequence(30, 1, 1),
      If(

          !(Weekday(DateAdd(Today(), -Value)) = 1
         || Weekday(DateAdd(Today(), -Value)) = 7),
           {
              RowID: Value,
              Date: DateAdd(Today(), -Value)
           }
      )
    )
);
Within the next or previous 30 days, get all weekdays
We can have a month in either direction by starting the dates 30 days ago and doubling the number of days in the sequence to 60:
// Create BD60 Date Range by adding 60 days starting 30 days ago
// but only if they are not sat/sun
ClearCollect(colBD60Range,
   ForAll(
      // This does the next 60 days and starts 30 days ago,
      // sequence can be as large as you need
      Sequence(60, 1, 1),
      If(

          !(Weekday(DateAdd(Today(), -30 + Value)) = 1
         || Weekday(DateAdd(Today(), -30 + Value)) = 7),
           {
              RowID: Value,
              Date: DateAdd(Today(), -30 + Value)
           }
      )
    )
);
Within the current year, get all weekdays
Instead of trying to just get the next or previous workdays in Power Apps, we can expand the range to an entire year (or more) by increasing the sequence amount and changing the start date:
// Create BusinessYear Date Range by adding 365 days
// starting on the first day of the Year
// but only if they are not sat/sun
ClearCollect(colBusinessYearRange,
   ForAll(
      // This does the next 365 days and starts on the first day of the year
      // sequence can be as large as you need
      // NB starts on zero so that 1/1/YEAR included in list of dates
      Sequence(365, 0, 1),
      If(

          !(Weekday(DateAdd(Date(Year(Today()), 1, 1), Value)) = 1
         || Weekday(DateAdd(Date(Year(Today()), 1, 1), Value)) = 7),
           {
              RowID: Value,
              Date: DateAdd(Date(Year(Today()), 1, 1), Value)
           }
      )
    )
);
Validation of weekdays in Power Apps – two possible paths
Validation can take many forms, such as making a label’s text change (i.e. an error displayed), or changing the DisplayMode of a submit button, or any kind of conditional situation that ensures your users input the correct information.
There are two ways we can easily validate, depending on how we want to approach it.
- The first way (the inefficient way in my opinion), is to generate a new collection for every possible validation. i.e. if we want to check whether something appears in a weekday within the next 10 days, we ClearCollect the whole collection to form a new collection showing only the weekdays within the next 10. I do not recommend that you use this method.
- The second way to approach this is to be smart. We already have this data in a collection, so we can use Filter, Search, LookUp, Index, FirstN, LastN and all of the shaping functions to get what we need out of the collection. Since we will be applying these changes to a local collection, the time taken is negligible, a few milliseconds so we can apply all sorts of validation for each call.
Let’s start with a simple one.
Validation: Label to indicate date exists in the collection
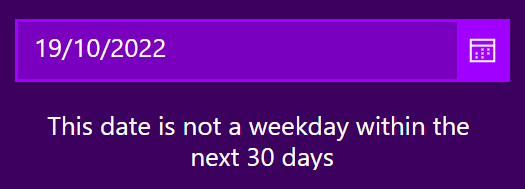
We will create a label to display a warning if the chosen date is not on a weekday within the next 30 days.
In our label, we change the Text property to:
If(
    // We check for blank so that when selected date is blank we don't get a message
    // as blank is not in colNBDRange
    !IsBlank(datNext30Days.SelectedDate) && datNext30Days.SelectedDate in colNBDRange.Date,
    "",
    "This date is not a weekday within the next 30 days"
)
Which results in something like this:
Validation: Label to indicate that date falls within X next weekdays in Power Apps
Often we have SLA’s that need to be met, and as such we need to calculate how many working days until a new date or whether a selected date falls within a certain range of business days.
We can do this by using the FirstN() function. As we have already removed the weekends from these collections, we only need to substitute the number of business days we need into the formula.
We then set our label’s Text property to the following (substituting your own control names and collection names):
With(
    { ValidNumberOfBusinessDays: 5},
    If(
        !IsBlank(datNext30Days.SelectedDate) && datNext30Days.SelectedDate in FirstN(colNBDRange, ValidNumberOfBusinessDays).Date,
        "",
        "This date is not within the next " & ValidNumberOfBusinessDays & " business days"
    )
)
Number of Weekdays between two dates
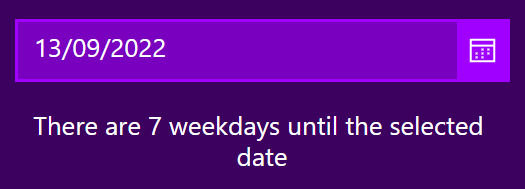
We can take the date logic we’ve been using and adapt it to figure out the number of weekdays between two dates. I will start with the example of determining the number of weekdays between today and a future date. We can do this by modifying the OnChange property of the DatePicker to create a collection of dates using the DateDiff function, and then by having a label display the results.
Modify the OnChange property of your DatePicker to the following:
// Create Date range of Weekdays by using the DateDiff function to determine how many items to iterate through
ClearCollect(colSelectedDateWeekdayRange,
   ForAll(
      // This takes the difference between Today and the selected date as a sequence
      Sequence(DateDiff(Today(), datNumberOfWeekdaysFromToday.SelectedDate), 1, 1),
      If(

          !(Weekday(DateAdd(Today(), Value)) = 1
         || Weekday(DateAdd(Today(), Value)) = 7),
           {
              RowID: Value,
              Date: DateAdd(Today(), Value)
           }
      )
    )
);
Then have your label’s Text property use the following to display the number of days:
If(
    !IsBlank(datNumberOfWeekdaysFromToday.SelectedDate),
    "There are " & CountRows(colSelectedDateWeekdayRange) & " weekdays until the selected date"
)
If we modify the formula slightly, we can make it tell us the number of weekdays between two selected dates.
We can add this code to both of our DatePickers’ OnChange to ensure it updates when either of them change:
// Create Date range of Weekdays by using the DateDiff function
// to determine how many items to iterate through
ClearCollect(
    colSelectedTwoDatesWeekdayRange,
    ForAll(
      // This takes the difference between the two dates as a sequence
        Sequence(
            //Here we are making sure the sequence is always a positive number
            // as must be between 0 and 50000
            If(
                datWeekdaysBetweenDatesSecond.SelectedDate >= datWeekdaysBetweenDatesFirst.SelectedDate,
                DateDiff(
                    datWeekdaysBetweenDatesFirst.SelectedDate,
                    datWeekdaysBetweenDatesSecond.SelectedDate
                ),
                DateDiff(
                    datWeekdaysBetweenDatesSecond.SelectedDate,
                    datWeekdaysBetweenDatesFirst.SelectedDate
                )
            ),
            1,
            1
        ),
        If(
            !(Weekday(
                DateAdd(
                    datWeekdaysBetweenDatesFirst.SelectedDate,
                    // Here we need to make sure we are creating dates
                    // in the right direction if larger/smaller
                    If(
                        datWeekdaysBetweenDatesSecond.SelectedDate >= datWeekdaysBetweenDatesFirst.SelectedDate,
                        Value,
                        -Value
                    )
                )
            ) = 1
            ||
            Weekday(
                DateAdd(
                    datWeekdaysBetweenDatesFirst.SelectedDate,
                     // Here we need to make sure we are creating dates
                    // in the right direction if larger/smaller
                    If(
                        datWeekdaysBetweenDatesSecond.SelectedDate >= datWeekdaysBetweenDatesFirst.SelectedDate,
                        Value,
                        -Value
                    )
                )
            ) = 7),
            {
                RowID: Value,
                Date: DateAdd(
                    datWeekdaysBetweenDatesFirst.SelectedDate,
                     // Here we need to make sure we are creating dates
                    // in the right direction if larger/smaller
                    If(
                        datWeekdaysBetweenDatesSecond.SelectedDate >= datWeekdaysBetweenDatesFirst.SelectedDate,
                        Value,
                        -Value
                    )
                )
            }
        )
    )
);
Our label’s Text property can then become:
If(
    !IsBlank(datWeekdaysBetweenDatesFirst.SelectedDate) && !IsBlank(datWeekdaysBetweenDatesSecond.SelectedDate),
    "There are " & CountRows(colSelectedTwoDatesWeekdayRange) & " weekdays between the two selected dates"
)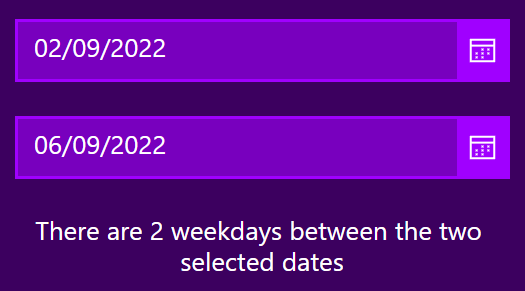
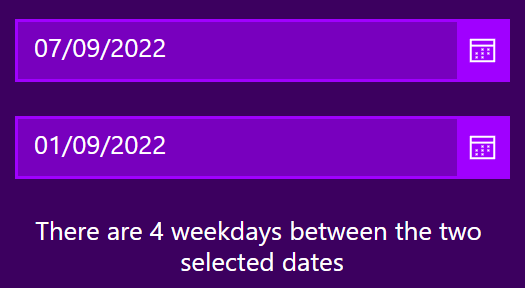
It is worth clarifying that this is days between, and does not include the original date as a weekday, you can modify the sequence formula to add a +1 to each condition if you want to include the original date as well.
Validation: Total number of weekdays from Start Date to End Date
Now we might, for business purposes, always want the first date to be before the second date and we may want to determine the total number of weekdays an event is occurring on.
We can validate this fairly easily using our previous example of two selected dates.
In our OnChange code, we no longer need to concern ourselves as to whether the first date is greater than the second, and we want to ensure the Start Date is included in our calculations. This means we will need to make sure the sequence includes the original Day after the DateDiff is performed.
We modify our OnChange code to the following for each of the DatePickers:
// Create Date range of Weekdays by using the DateDiff function
// to determine how many items to iterate through
If(
// Only create collection when dates are valid
datStartDate.SelectedDate <= datEndDate.SelectedDate,
ClearCollect(
colStartDateEndDateWeekdayRange,
ForAll(
// This takes the difference between the two dates as a sequence
Sequence(
//This will always be positive
DateDiff(
datStartDate.SelectedDate,
datEndDate.SelectedDate
)
// This plus one is to ensure the Start Date is
// included in the total after the DateDiff is performed.
+1,
// We use zero here to ensure first date taken is start date
0,
1
),
If(
!(
Weekday( DateAdd( datStartDate.SelectedDate, Value) ) = 1
||
Weekday( DateAdd( datStartDate.SelectedDate, Value) ) = 7
),
{
RowID: Value,
Date: DateAdd(
datStartDate.SelectedDate,
Value
)
}
)
)
)
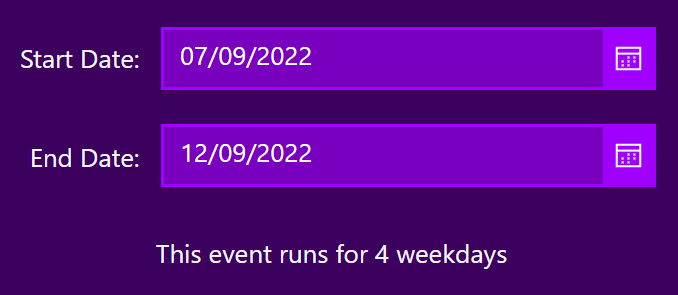
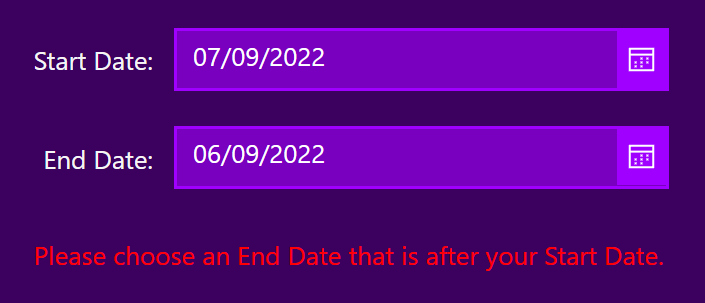
);We can then have our initial user warning in our label. The code for our label’s Text property can be changed to:
If(
    datStartDate.SelectedDate > datEndDate.SelectedDate,
    " Please choose an End Date that is after your Start Date.",
    !IsBlank(datStartDate.SelectedDate) && !IsBlank(datEndDate.SelectedDate),
    "This event runs for " & CountRows(colStartDateEndDateWeekdayRange) & " weekdays"
)
As and additional piece of validation/warning we can make the text change colour when the chosen dates are invalid. We could also do things like disable submit buttons, change bordercolors of the datepickers and various other methods to help our users via warnings/errors.
Let’s just focus on one change for now and modify the Color property of the label to the following:
If(
    datStartDate.SelectedDate > datEndDate.SelectedDate,
    Red,
    RGBA(0, 0, 0, 1)
)
We have now covered multiple ways of dealing with and handling weekdays in Power Apps.
I hope this blog post has been useful!
Please feel free to modify and use any of the code I’ve provided here for your own use – if you come up with a better way then please also feel free to share it!
Thanks for reading this and I hope you have a cat-tastic day!
If you’d like to see some more of my other posts, feel free to head on over here: iAm_ManCat Blog
You can find links to my various social media accounts at the bottom-right of this page.


My prior comment did not format nicely. Please let me know if interested in helping. I can send the formatted detail separately in an email. Thanks . Long shot here asking for help
I need some help with dates and parsing in Power Apps. You appear to be very knowledgeable here and hoping for some help.
Struggling a bit on how to replicate calcs that are fairly easy to do in Excel. Here is an example, hoping you or team may have some suggestions.
A user enters start and end dates for a resource and hours needed to cost and price . Something like below, 2 records are entered. There are many more attributes here like job profile, resource name, practice area , cost/hour, price/hour etc, but these are the ones relevant to this challenge.
Note that hours are not scheduled on weekends.
header Table (user entry)
Header_ID Startdate Enddate Hours Workdays Hrs/day
1 8/1/2023 1/31/2025 1,970.00 394 5
2 8/15/2023 3/29/2024 1,148.00 164 7
I want to transform this into a collection /table that parses out the months and hours relevant to each month. Hoe would you do this?
The goal is to be able to create a report that shows hours (or cost or revenue) by month.
The users need this to enter schedule into Salesforce revenue schedules.
Detail table (reporting table, COLA adjs, etc)
Detail_ID Header_ID Month Hours (T&M) Check
1 1 Aug-23 115
2 1 Sep-23 105
3 1 Oct-23 110
4 1 Nov-23 110
5 1 Dec-23 105
6 1 Jan-24 115
7 1 Feb-24 105
8 1 Mar-24 105
9 1 Apr-24 110
10 1 May-24 115
11 1 Jun-24 100
12 1 Jul-24 115
13 1 Aug-24 110
14 1 Sep-24 105
15 1 Oct-24 115
16 1 Nov-24 105
17 1 Dec-24 110
18 1 Jan-25 115 1,970
19 2 Aug-23 91
20 2 Sep-23 147
21 2 Oct-23 154
22 2 Nov-23 154
23 2 Dec-23 147
24 2 Jan-24 161
25 2 Feb-24 147
26 2 Mar-24 147 1,148
Hi Scott,
I’d recommend raising this on the Power Apps Community forums, as I don’t have the scope/time currently to solve this. There are many Super Users on the forums that would be able to help you solve this 🙂
Your best bet it to raise it here:
https://powerusers.microsoft.com/t5/Building-Power-Apps/bd-p/PowerAppsForum1
Cheers,
Sancho